Google Tag Manager
Google Tag Manager is a powerful tool that allows you to track and measure various user interactions on your website. By creating Tags in GTM you get to integrate multiple 3rd party analytics and marketing providers (in addition to those already set within GTM) into your websites or mobile apps. Thanks to GTM, you no longer need to add these tags directly to your projects— You simply need to configure and control their performance from your Tag Manager's user interface.
Prerequisites
- To enable GTM in your Frontegg app, you need to open a Google Tag Manager account and obtain a GTM key, formatted as "GTM-XXXXXX".
- To enable GTM, you must have a Custom Domain. Learn more.
- Hosted Login users don't need to update their app version. If you are anEmbedded Login user, you will need to update your version to the following:
React: 6.0.2
Vue: 3.0.2
Angular: 6.2.0
Next: 8.0.2
How it Works
When you integrate GTM (Google Tag Manager) with your Frontegg-supported app, you gain the ability to monitor your users' actions effortlessly. You can also report the events with an onFronteggEvent function. You will need to set up your Portal Environment and your GTM Portal to track and push the data to your marketing/analytics applications (whether 3rd party applications or Google-supported ones, e.g., Google Analytics). For a streamlined setup process, refer to the following checklist:
Open a GTM account
Go to google tag manager and open an account.
GTM tracking
To ensure proper GTM tracking, add your container ID to the login pages you wish to track for events.
Configure GTM in Your Environment Settings
Integrating GTM into your Frontegg app is almost as easy as toggling a button ON. You will need to set up your GTM integration in your Environments with the Container ID you received from your GTM account.
Environment-specific GTM Configuration
GTM configuration is environment-specific; enabling it for your Development environment does not automatically mirror it in to your Production environment. You must configure both environments manually to ensure GTM support.
To configure GTM with Frontegg, do the following:
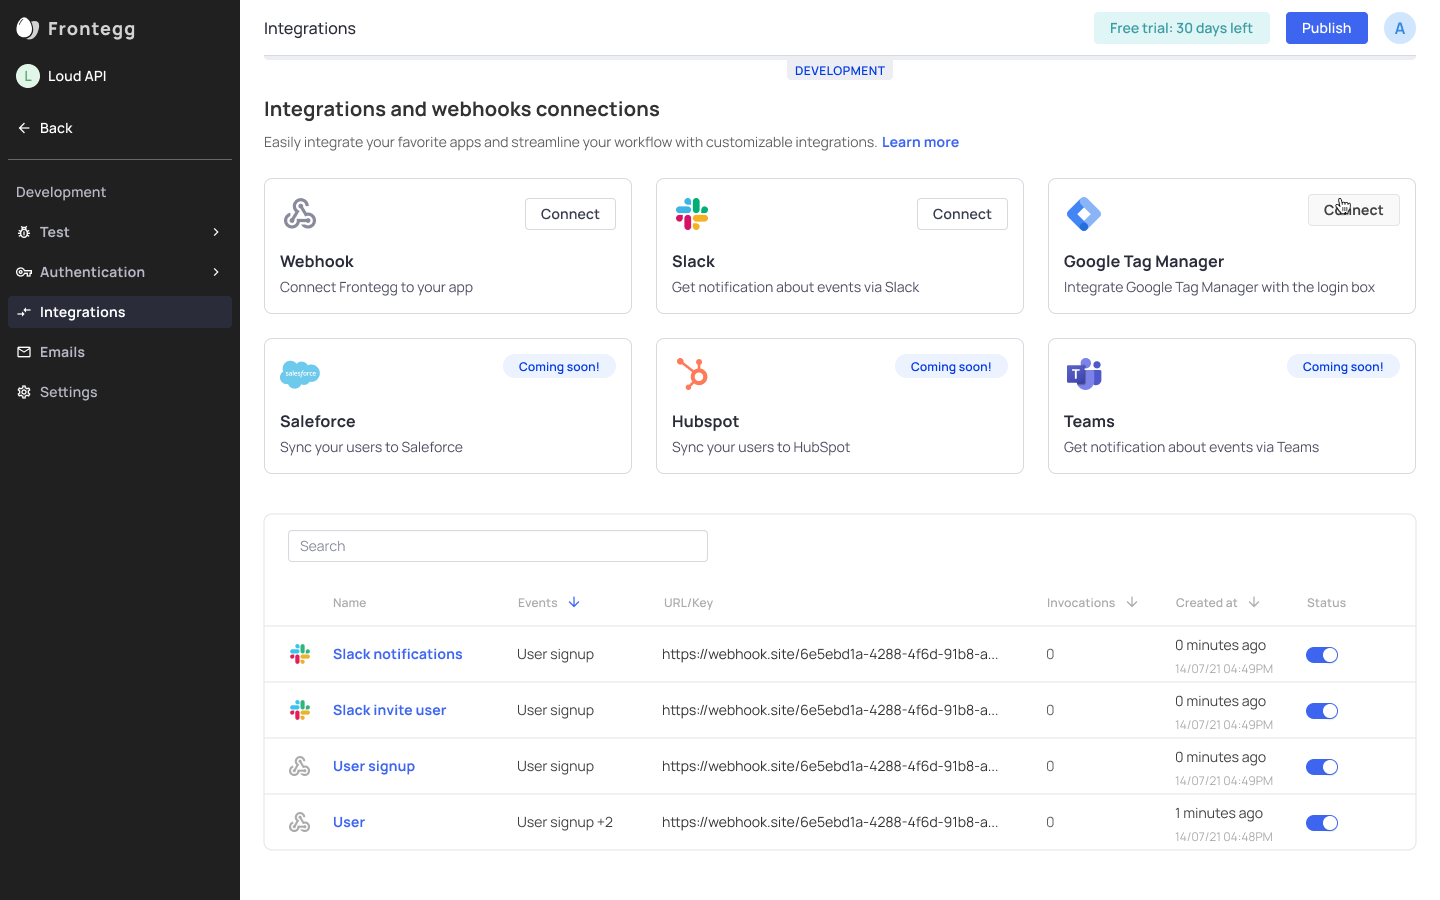
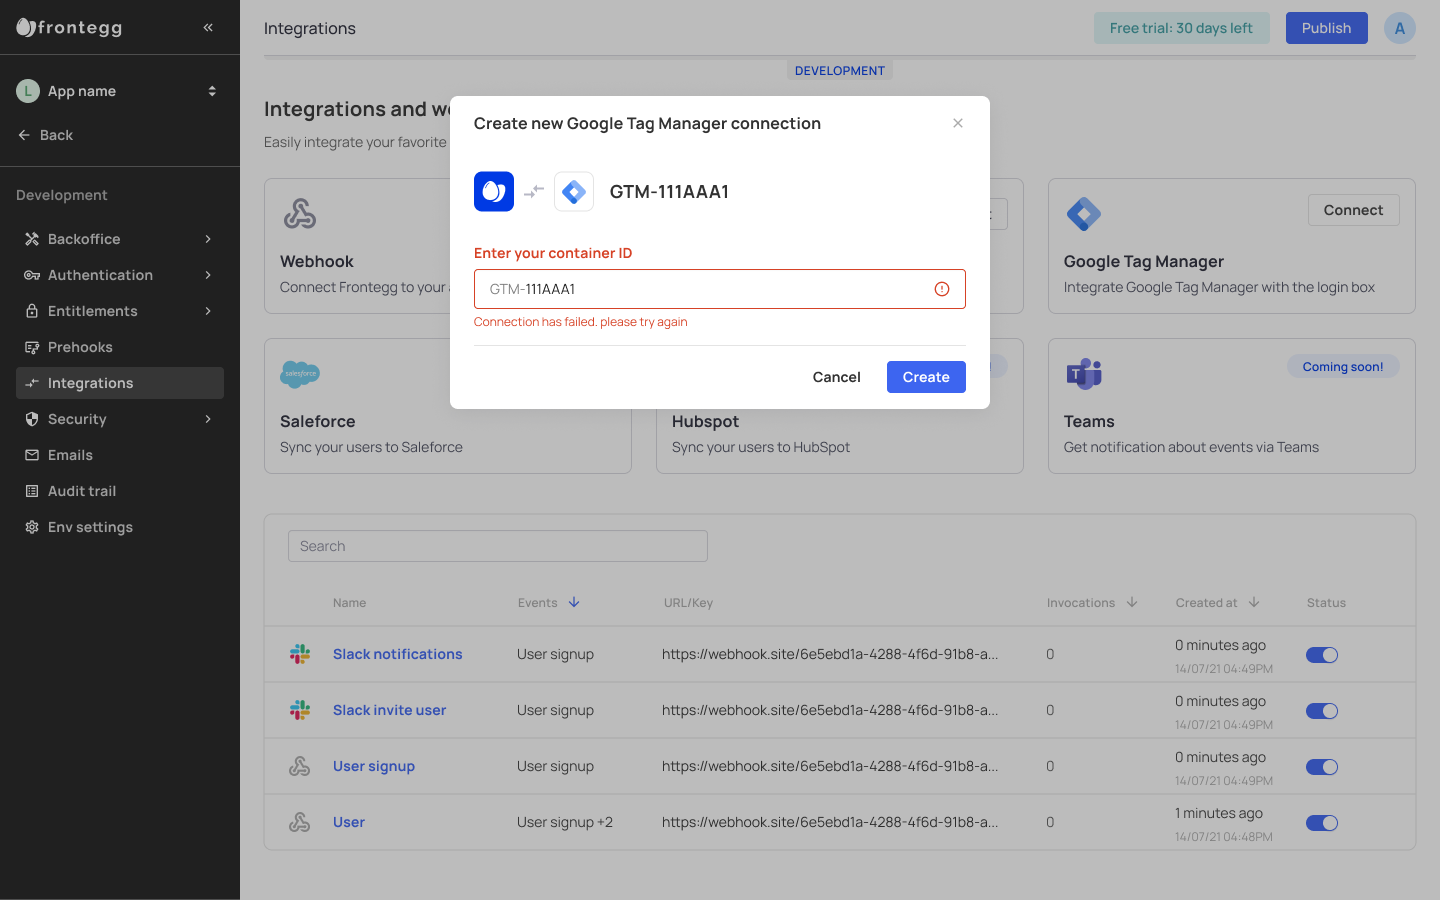
Step 1: Go to your Frontegg Portal , proceed to Environment > Integrations, and locate the Google Tag Manager integration:
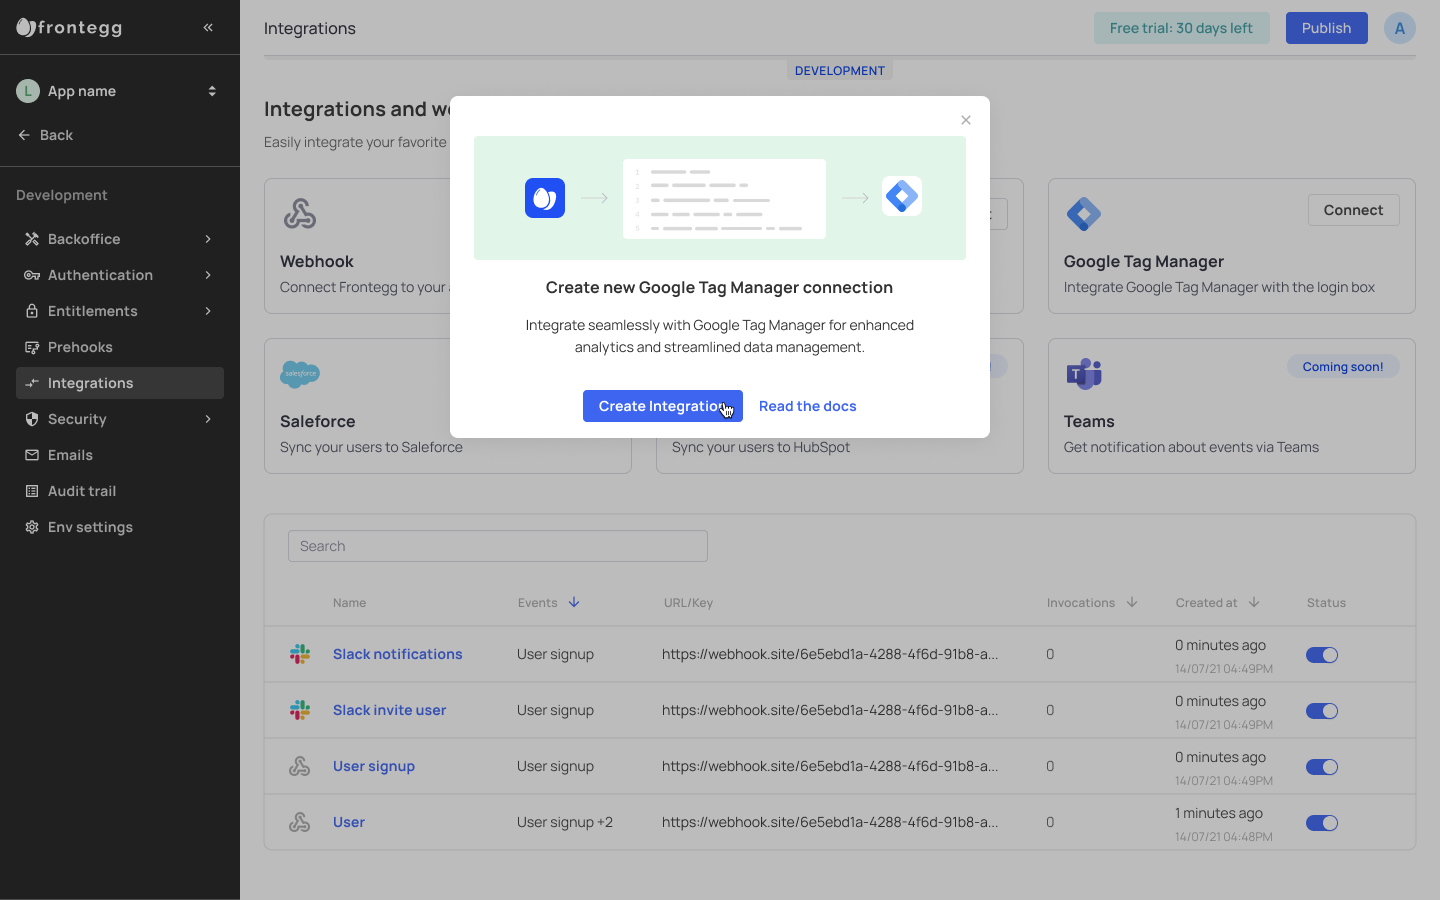
Step 2: Press Connect and proceed with Create Integration.
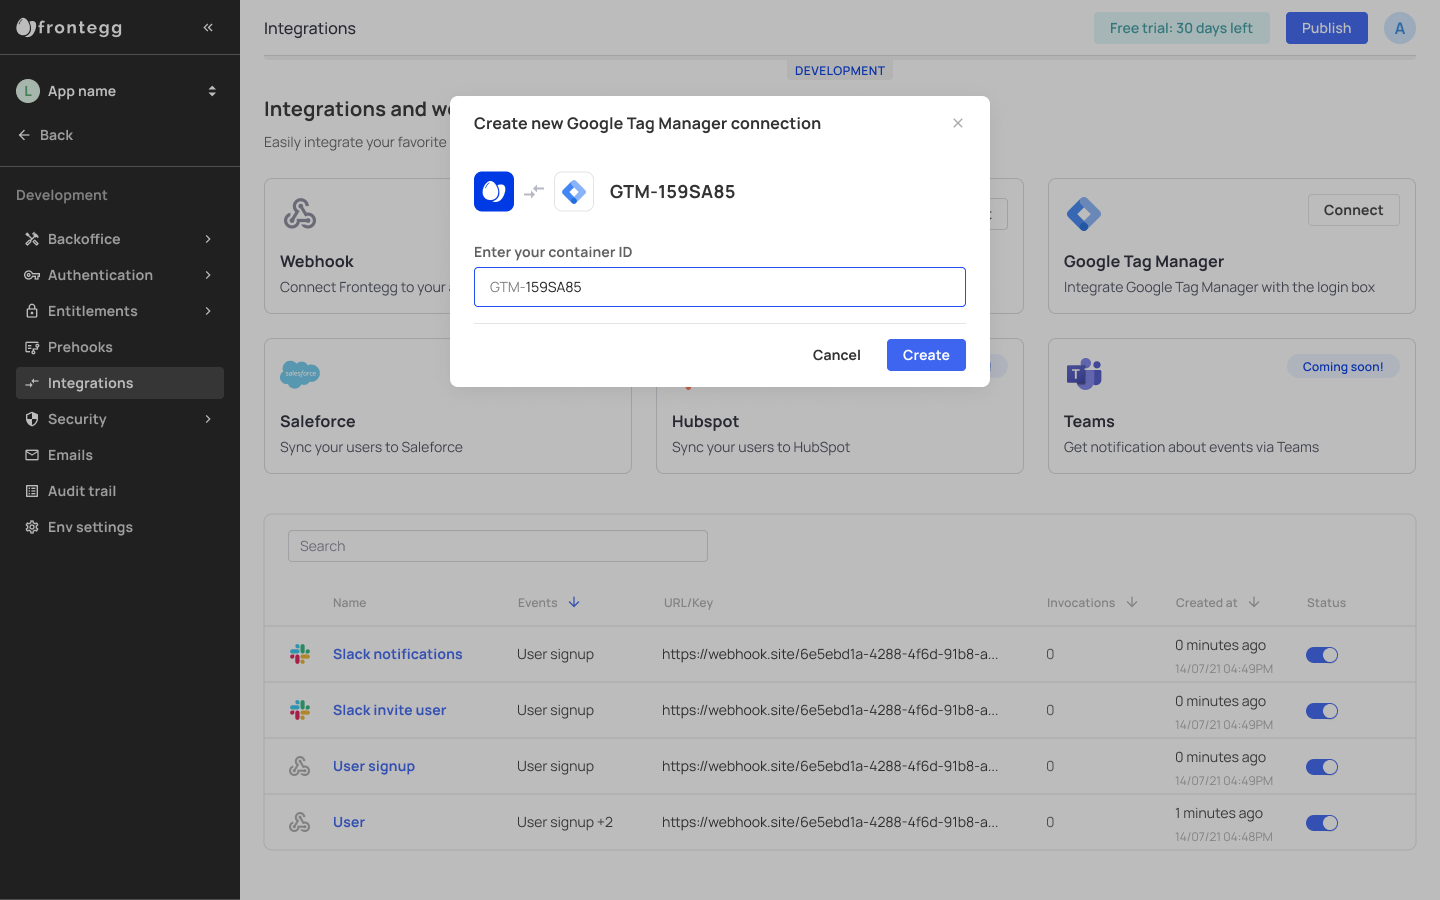
Step 3: Insert your GTM Container ID and press Create.
Fetching Your GTM Key (Container ID)
To enable GTM in your Frontegg Environment, you need to have a GTM Key. To locate your GTM key from your Tag Manager, go to Tag Manager> Workspace > Container ID (located at top, and formatted as "GTM-XXXXXX")
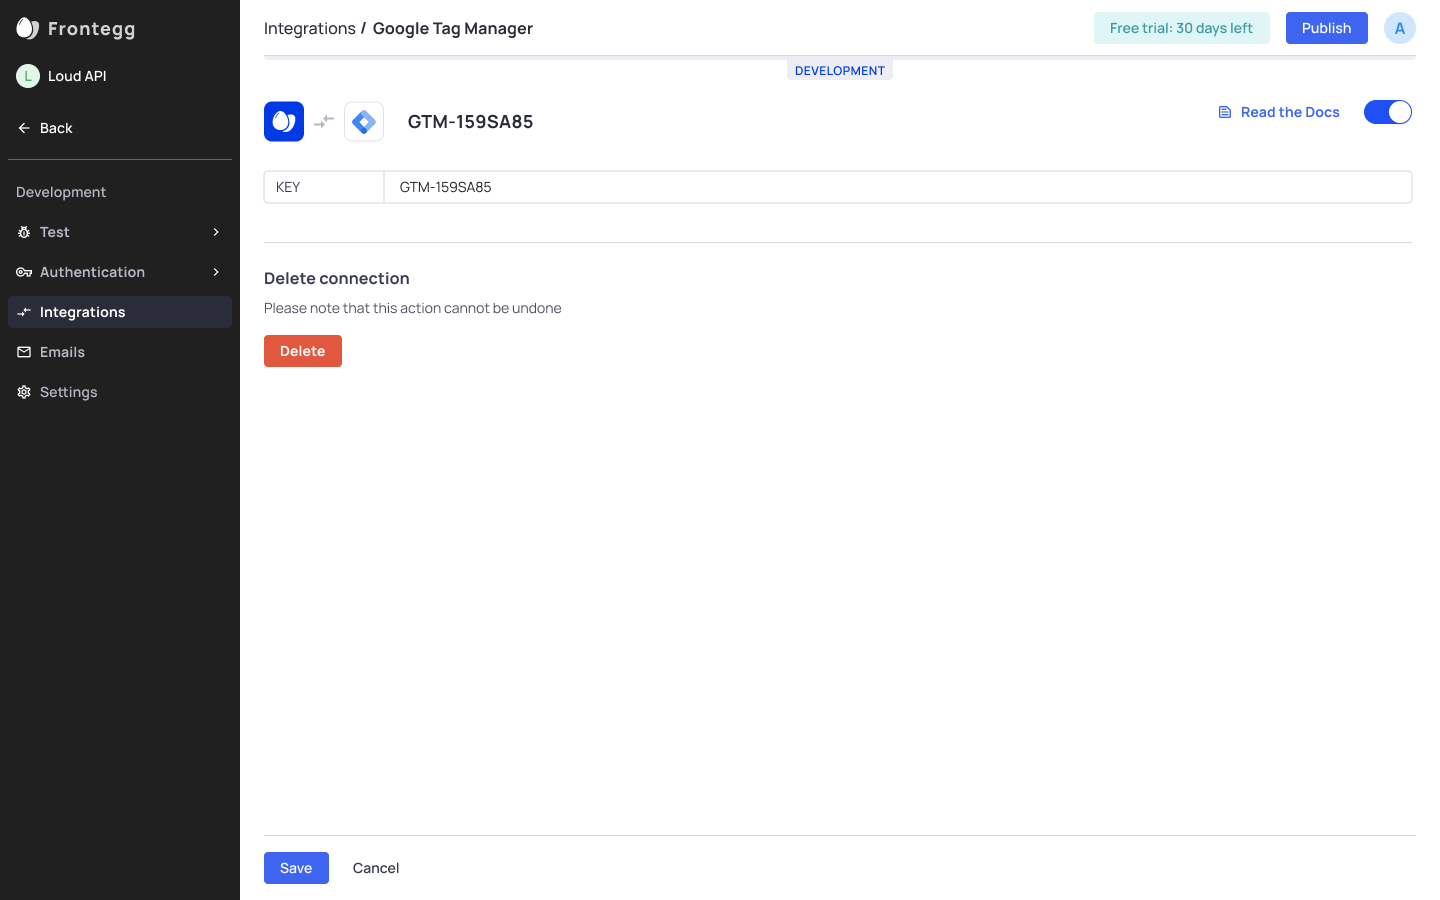
Step 4: Click Save. Your GTM integration is now officially enabled.
Troubleshooting: GTM Connectivity
Once you've created a GTM connection, the verification process should be instantaneous. If you see an Error message, it can be due to the following reasons:
- Your GTM connection has failed. Check your GTM credentials to verify it is identical to those found in your tag manager's Container ID.
- You entered a Container ID that already exists.
- You mistyped the Container ID.
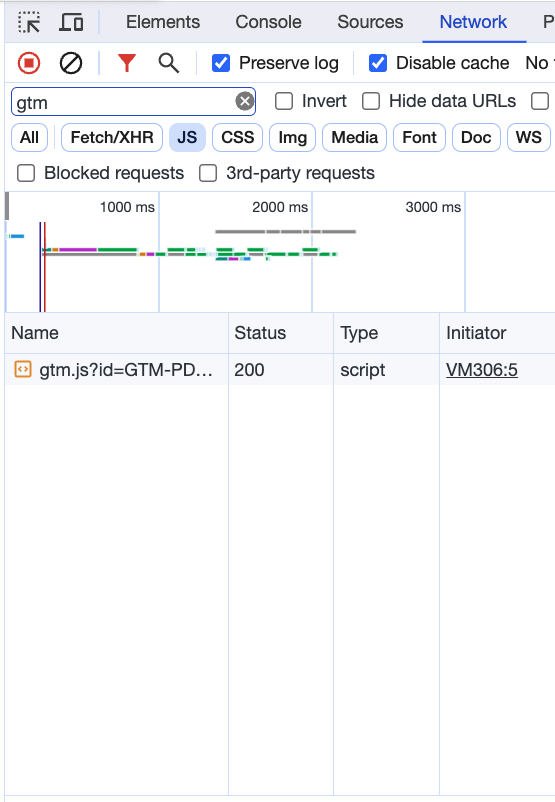
Test your GTM integration
To ensure proper setting of your GTM integration with Frontegg, go to your login page, and open your Network. Filter for a gtm property to ensure the tag was properly set.
Reporting Events via Tags
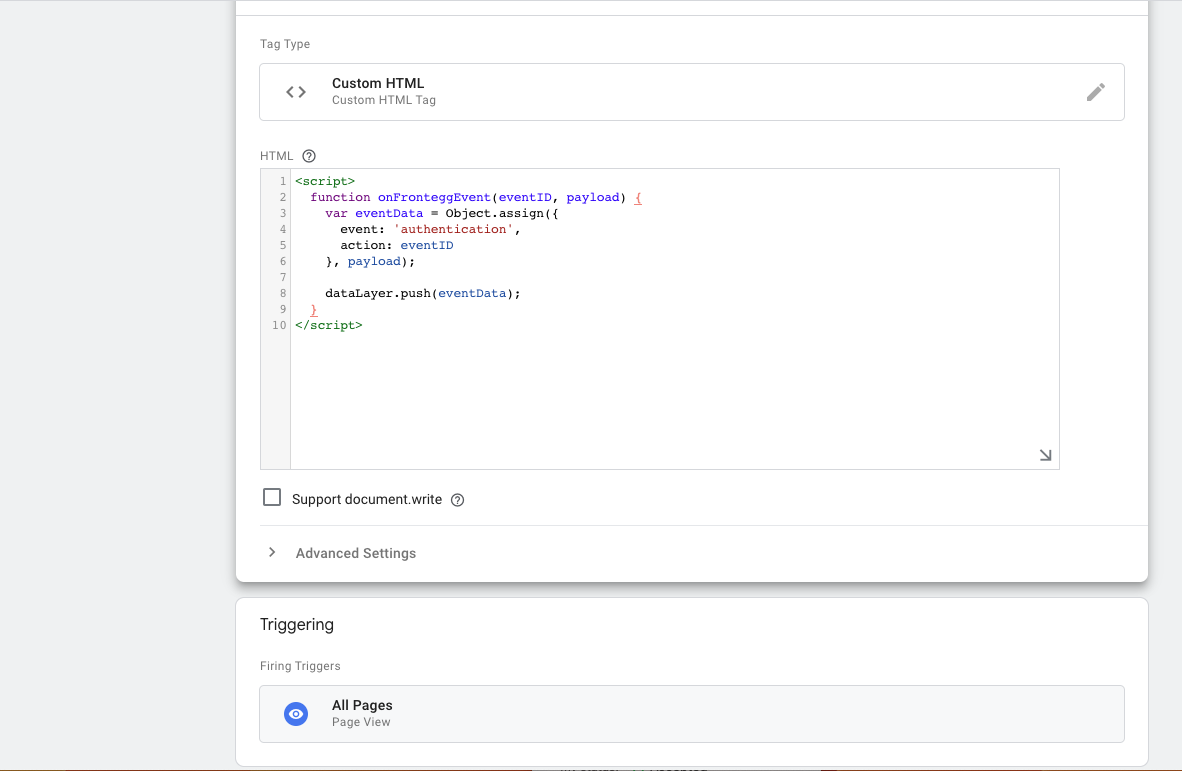
Currently, Frontegg tracks two essential event types: a user's signup_completed and user_verified.To set effective event tracking in Google Tag Manager, you'll need to configure a custom HTML tag and add anonFronteggEvent function to its script. The function will need to include two essential parameters: aneventID - signifying a user's action (signup_completed and user_verified) - and a payload— which corresponds to the event data you wish to receive after that action occurs.
OnFronteggEvent Breakdown
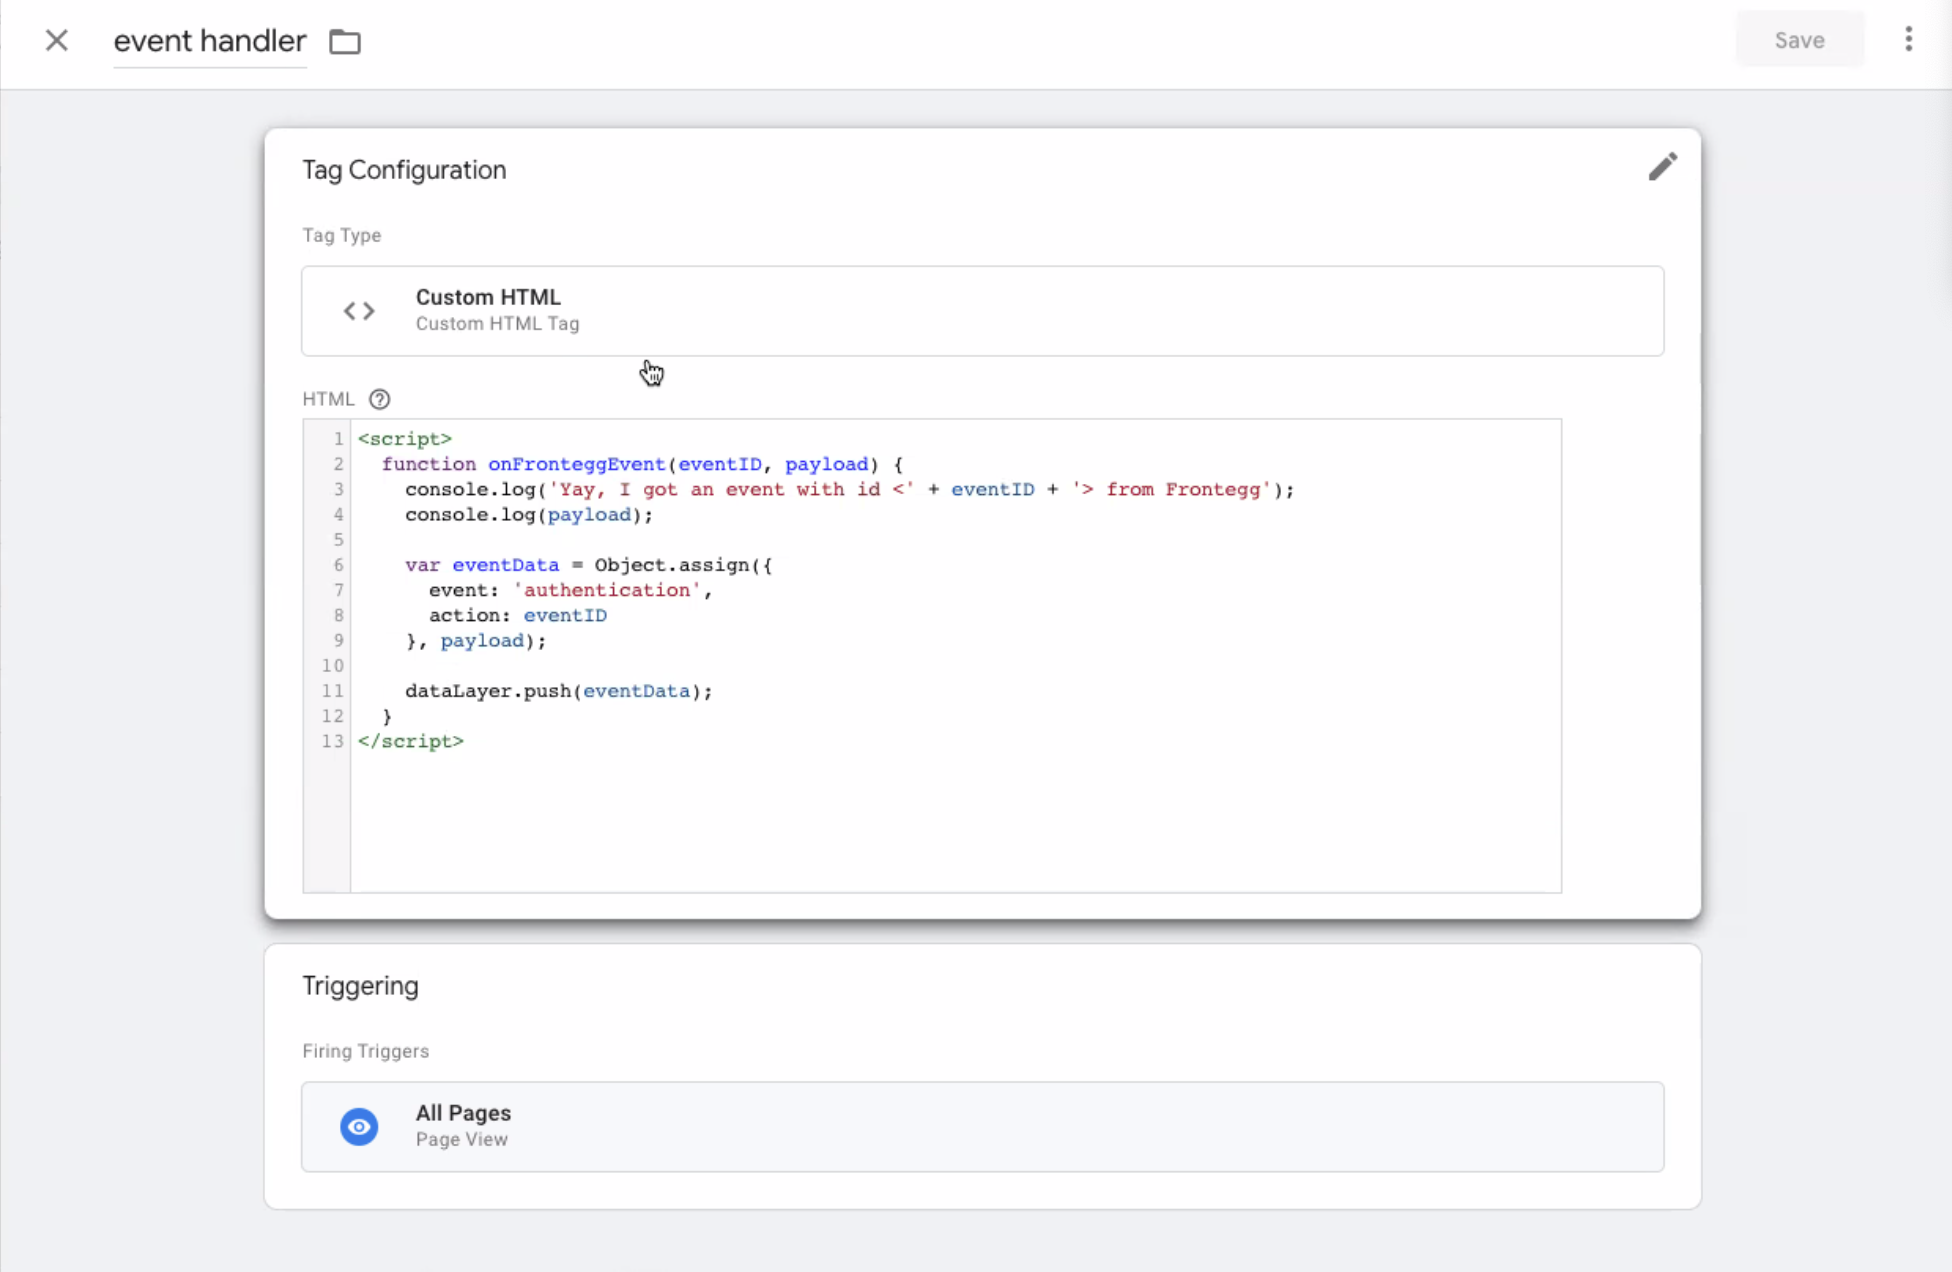
As you recall, your custom HTML script needs to include the following onFronteggEvent function. In addition to the function, you can add additional code to report to different third-party tools, (and not necessarily to GTM's dataLayer):
eventID: This parameter includes the events Frontegg tracks. Refer to the chart below for a list of events.
payload: The event data you wish to receive when an action (associated with the action that is triggered). Check for optional payloads in the chart below.
dataLayer: Refers to the GTM object that allows you to send events to GTM.
event: Fronteggs's default name for all evenIDs is authentication. You can modify the name. we recommend to set eventID with the same value (i.e., authentication like in the example, since it will reduce the number of tags you need to create in GTM.
action: The Event Name like signup_completed.
<script>
  function onFronteggEvent(eventID, payload) {
    var eventData = Object.assign({
      event: 'authentication',
      action: eventID
    }, payload);

    dataLayer.push(eventData);
	}
</script>
EventIDs and Payloads
The following table lists the EventIDs Frontegg currently tracks and their corresponding payloads:
| EventID | Payload |
|---|---|
| signup_completed | email; name;url (hash | host | hostname | href | origin | password | pathname); authenticationType;socialProvider``createdAt; id;tenantId; Search params |
| user_verified | email; name; url (hash | host | hostname | href | origin | password | pathname); authenticationType;socialProvider``createdAt; id;tenantId; Search params |
Use Case: Google Analytics Configuration
For Google Analytics, GTM's recommends configure it via their interface. (Note that different 3rd party tools don't need to be connected to GTM, and can only use the onFronteggEvent function).To integrate Google Analytics with Google Tag Manager, you need to include several parameters. Here's a high-level outline of the steps you need to implement to track your user's activity with Google Analytics.
- Go to your Admin section in Google Analytics (GA) and set up a new GA4 configuration event type. Obtain its GA tracking ID.
- Go to Google Tag Manager (GTM), and set up a custom HTML container with an
onFronteggEventfunction as indicated in the previous sections. - Create DataLayer variables
- Configure a custom event triggers
- Set Google Analytics page_view trigger
- Create a new Google Analytics: GA4 Event tag.
- Create a History Change trigger for page_views
Now let's break the tags' various components and devise them separately:
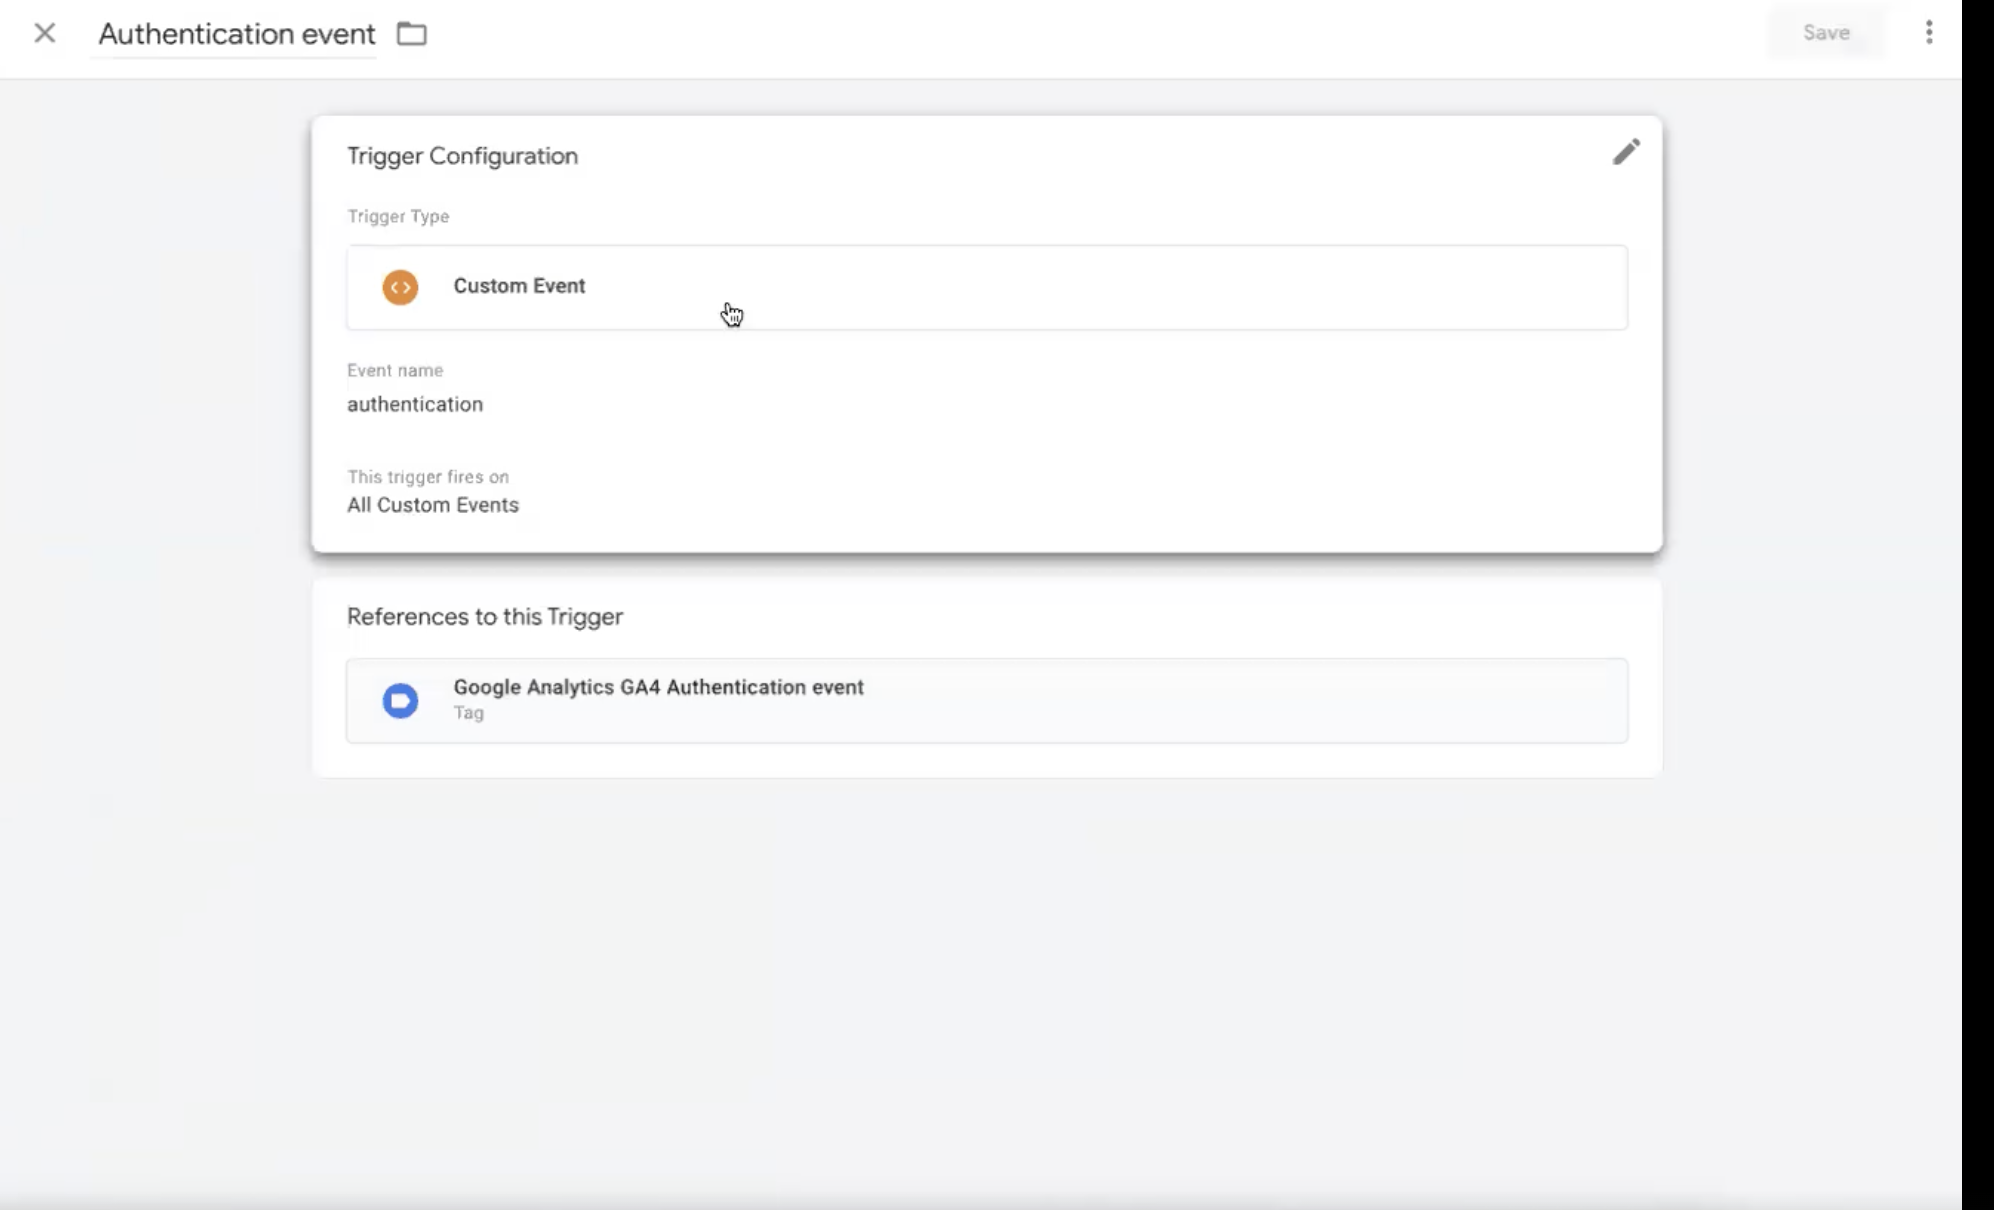
Configure Custom Event Trigger
- Create a Custom Event trigger.
- The Event Name should be
authentication - Click save
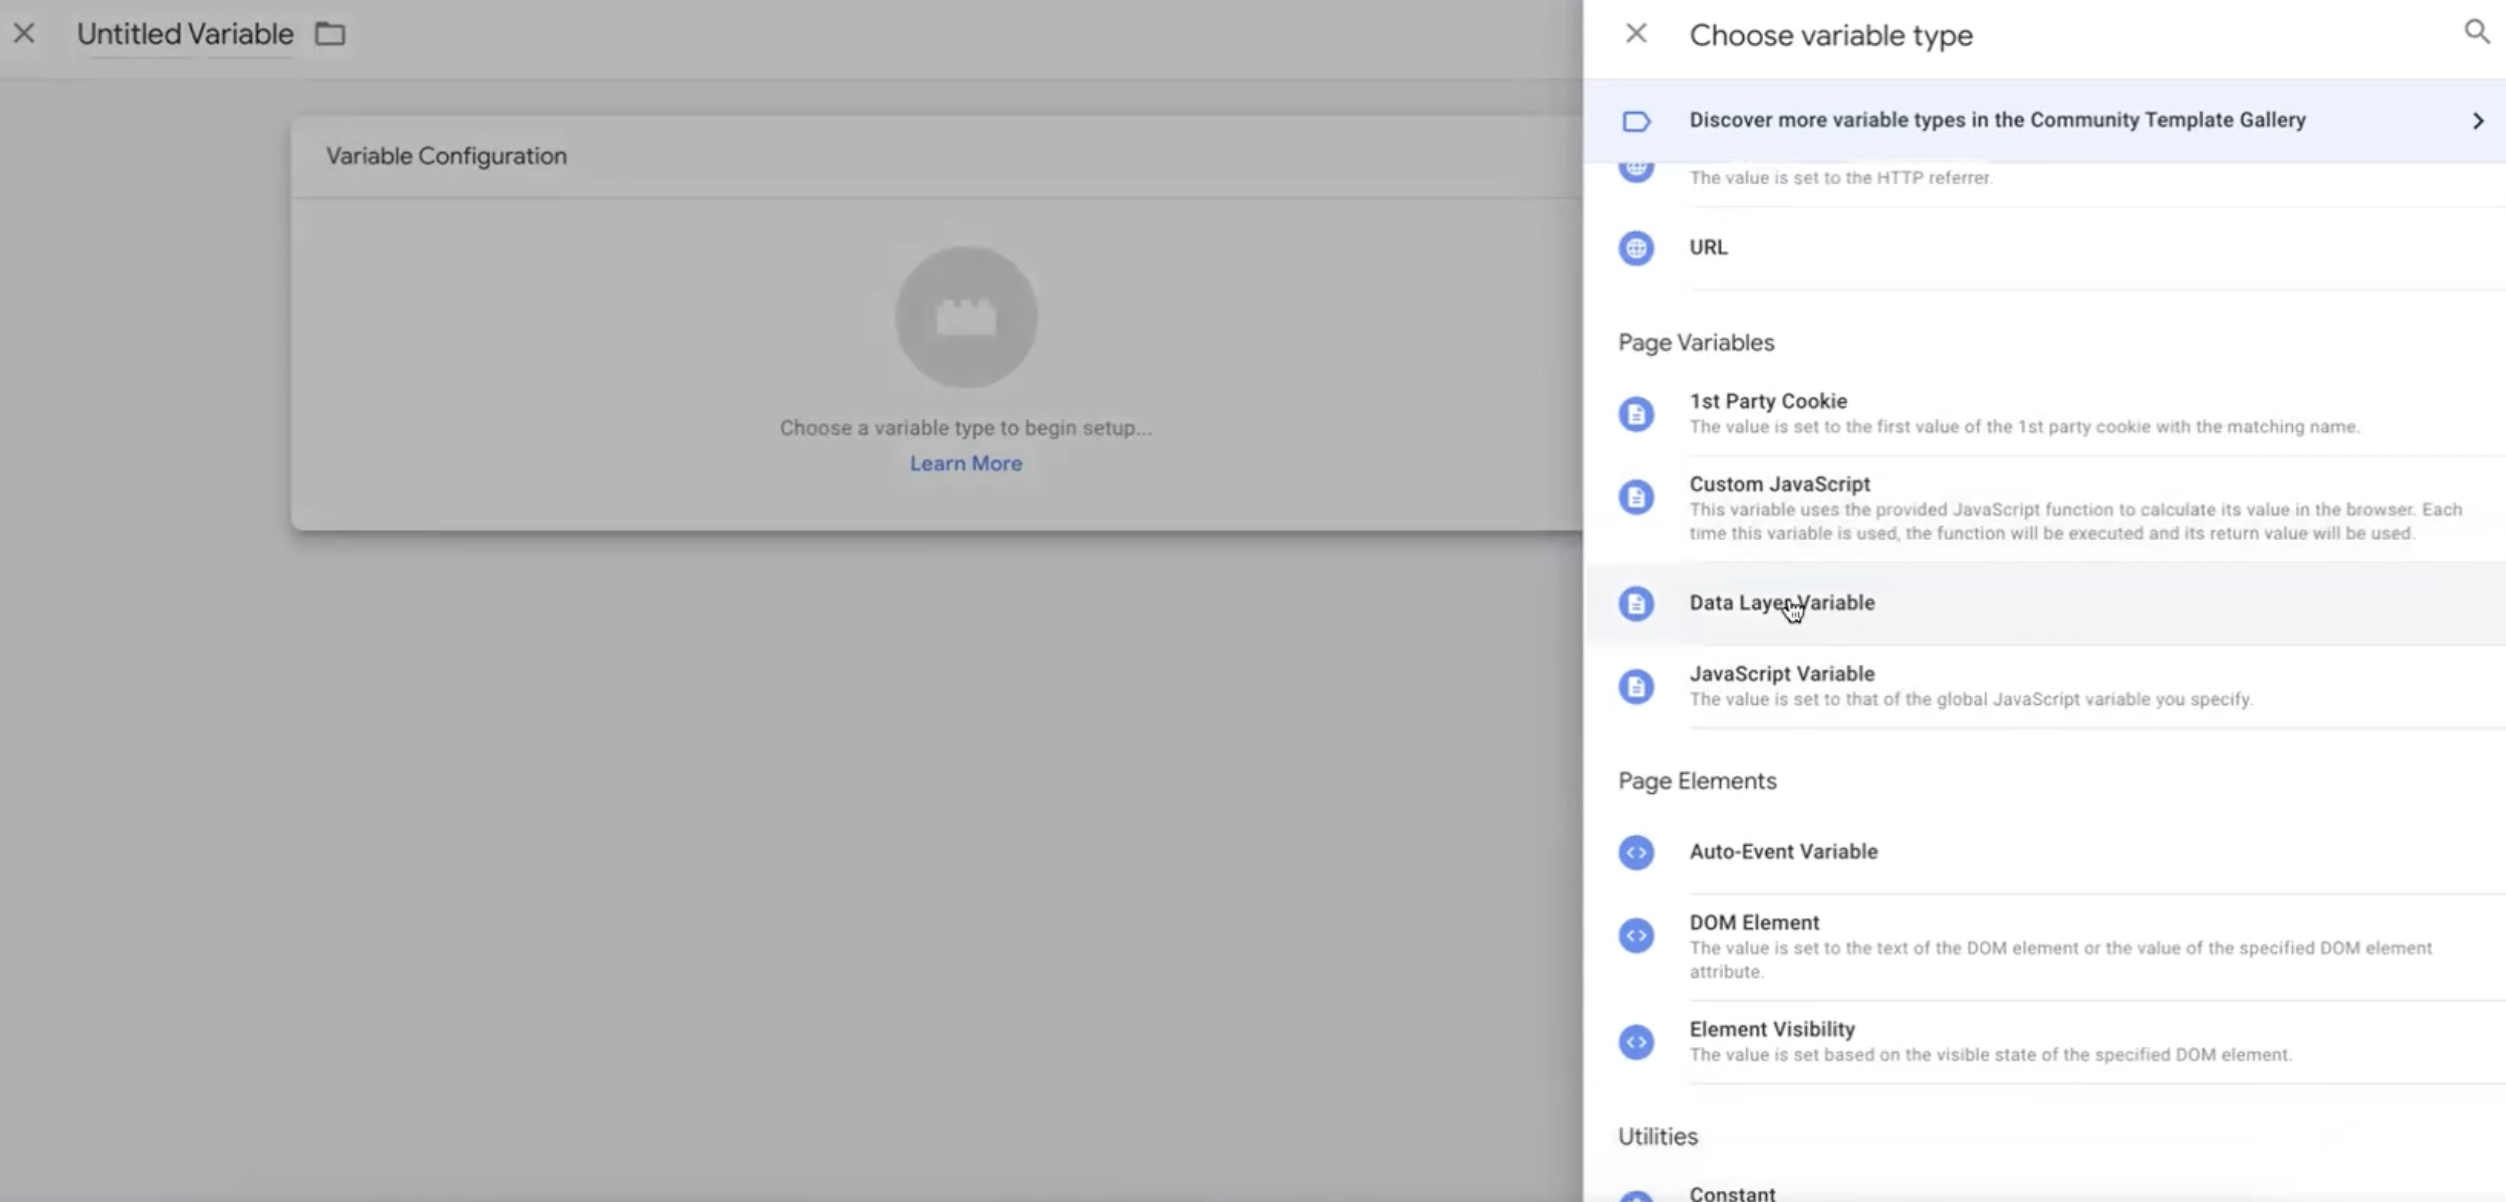
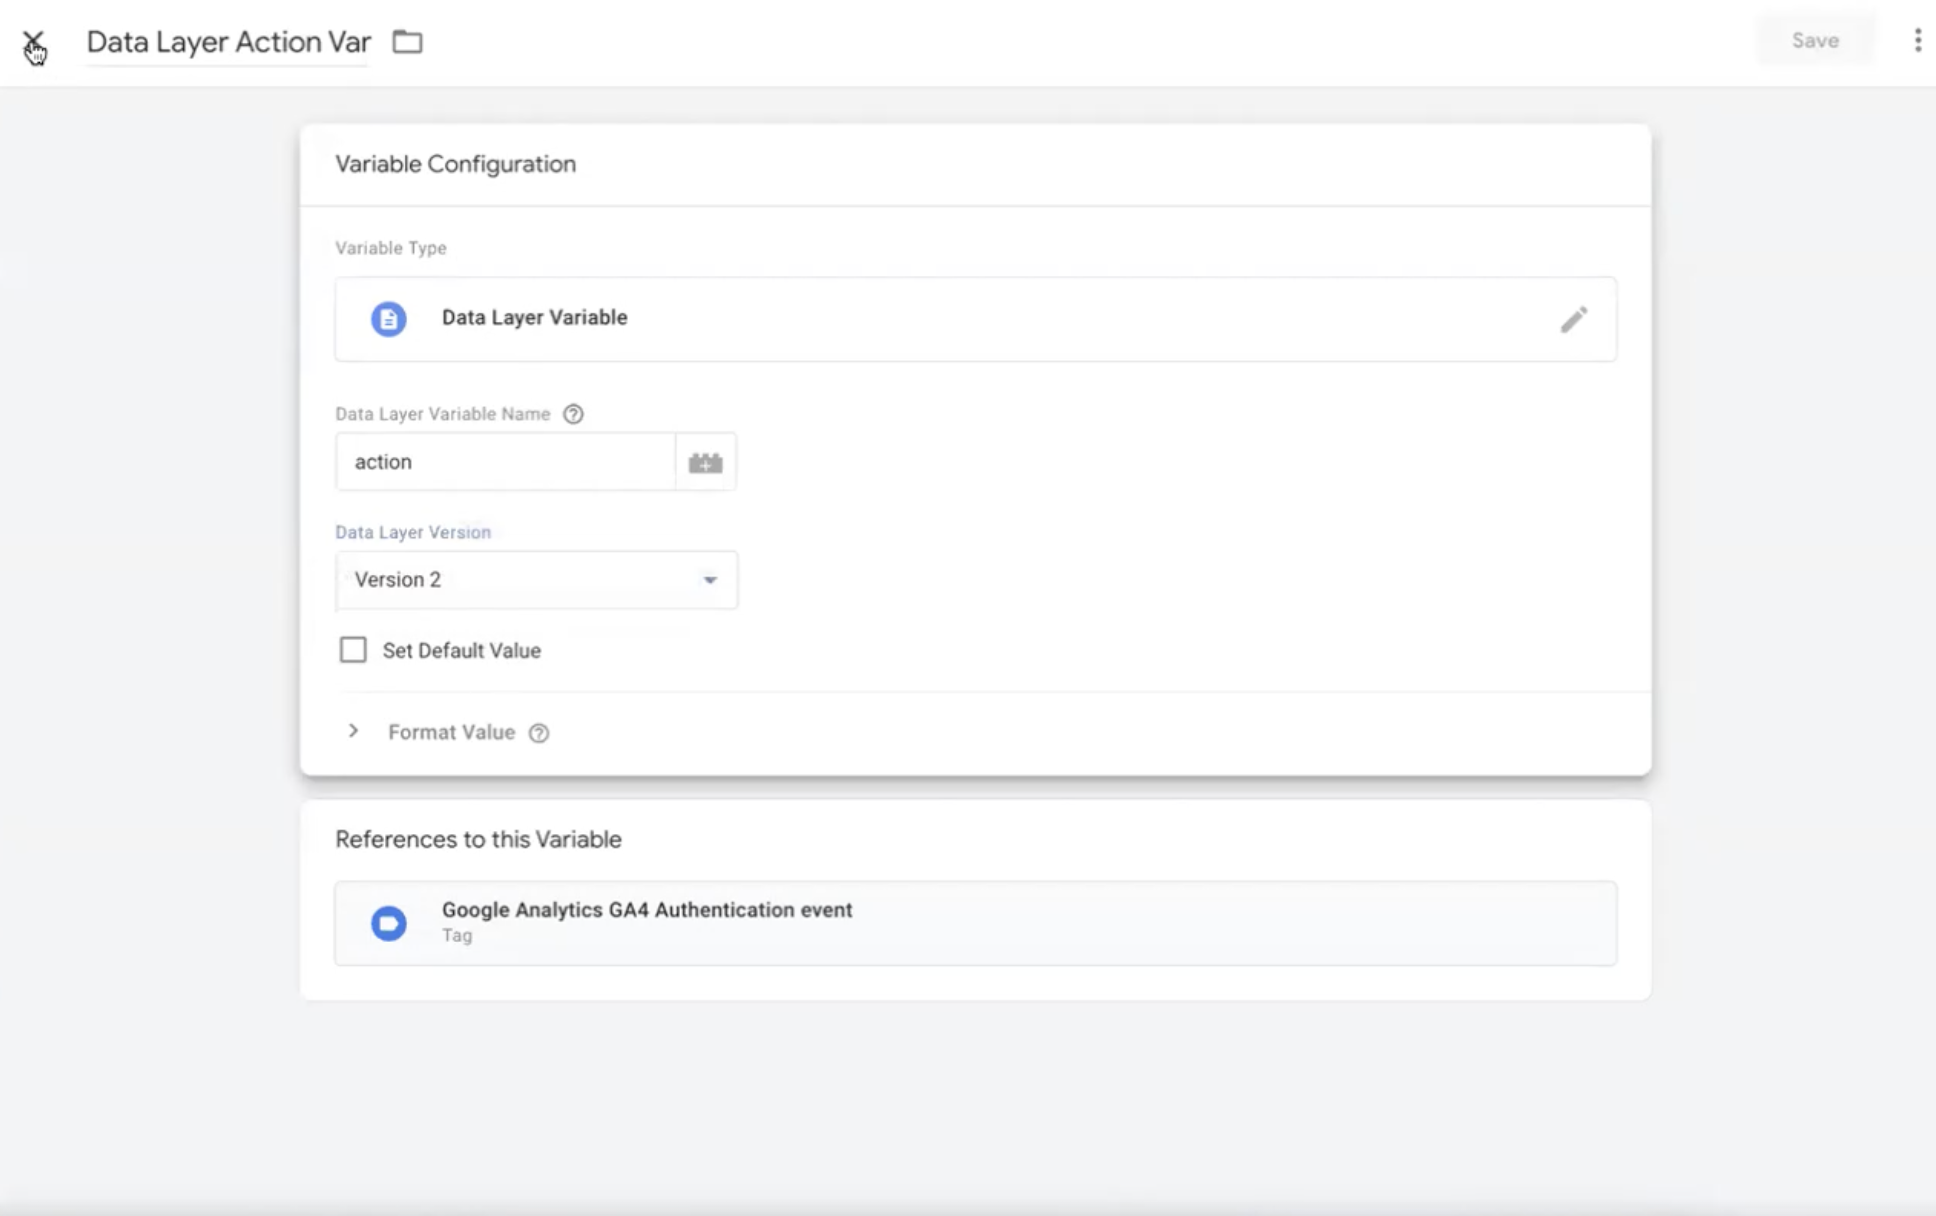
Create DataLayer variables
To configure variables for your Google Analytics tag, go to Variables from your left menu
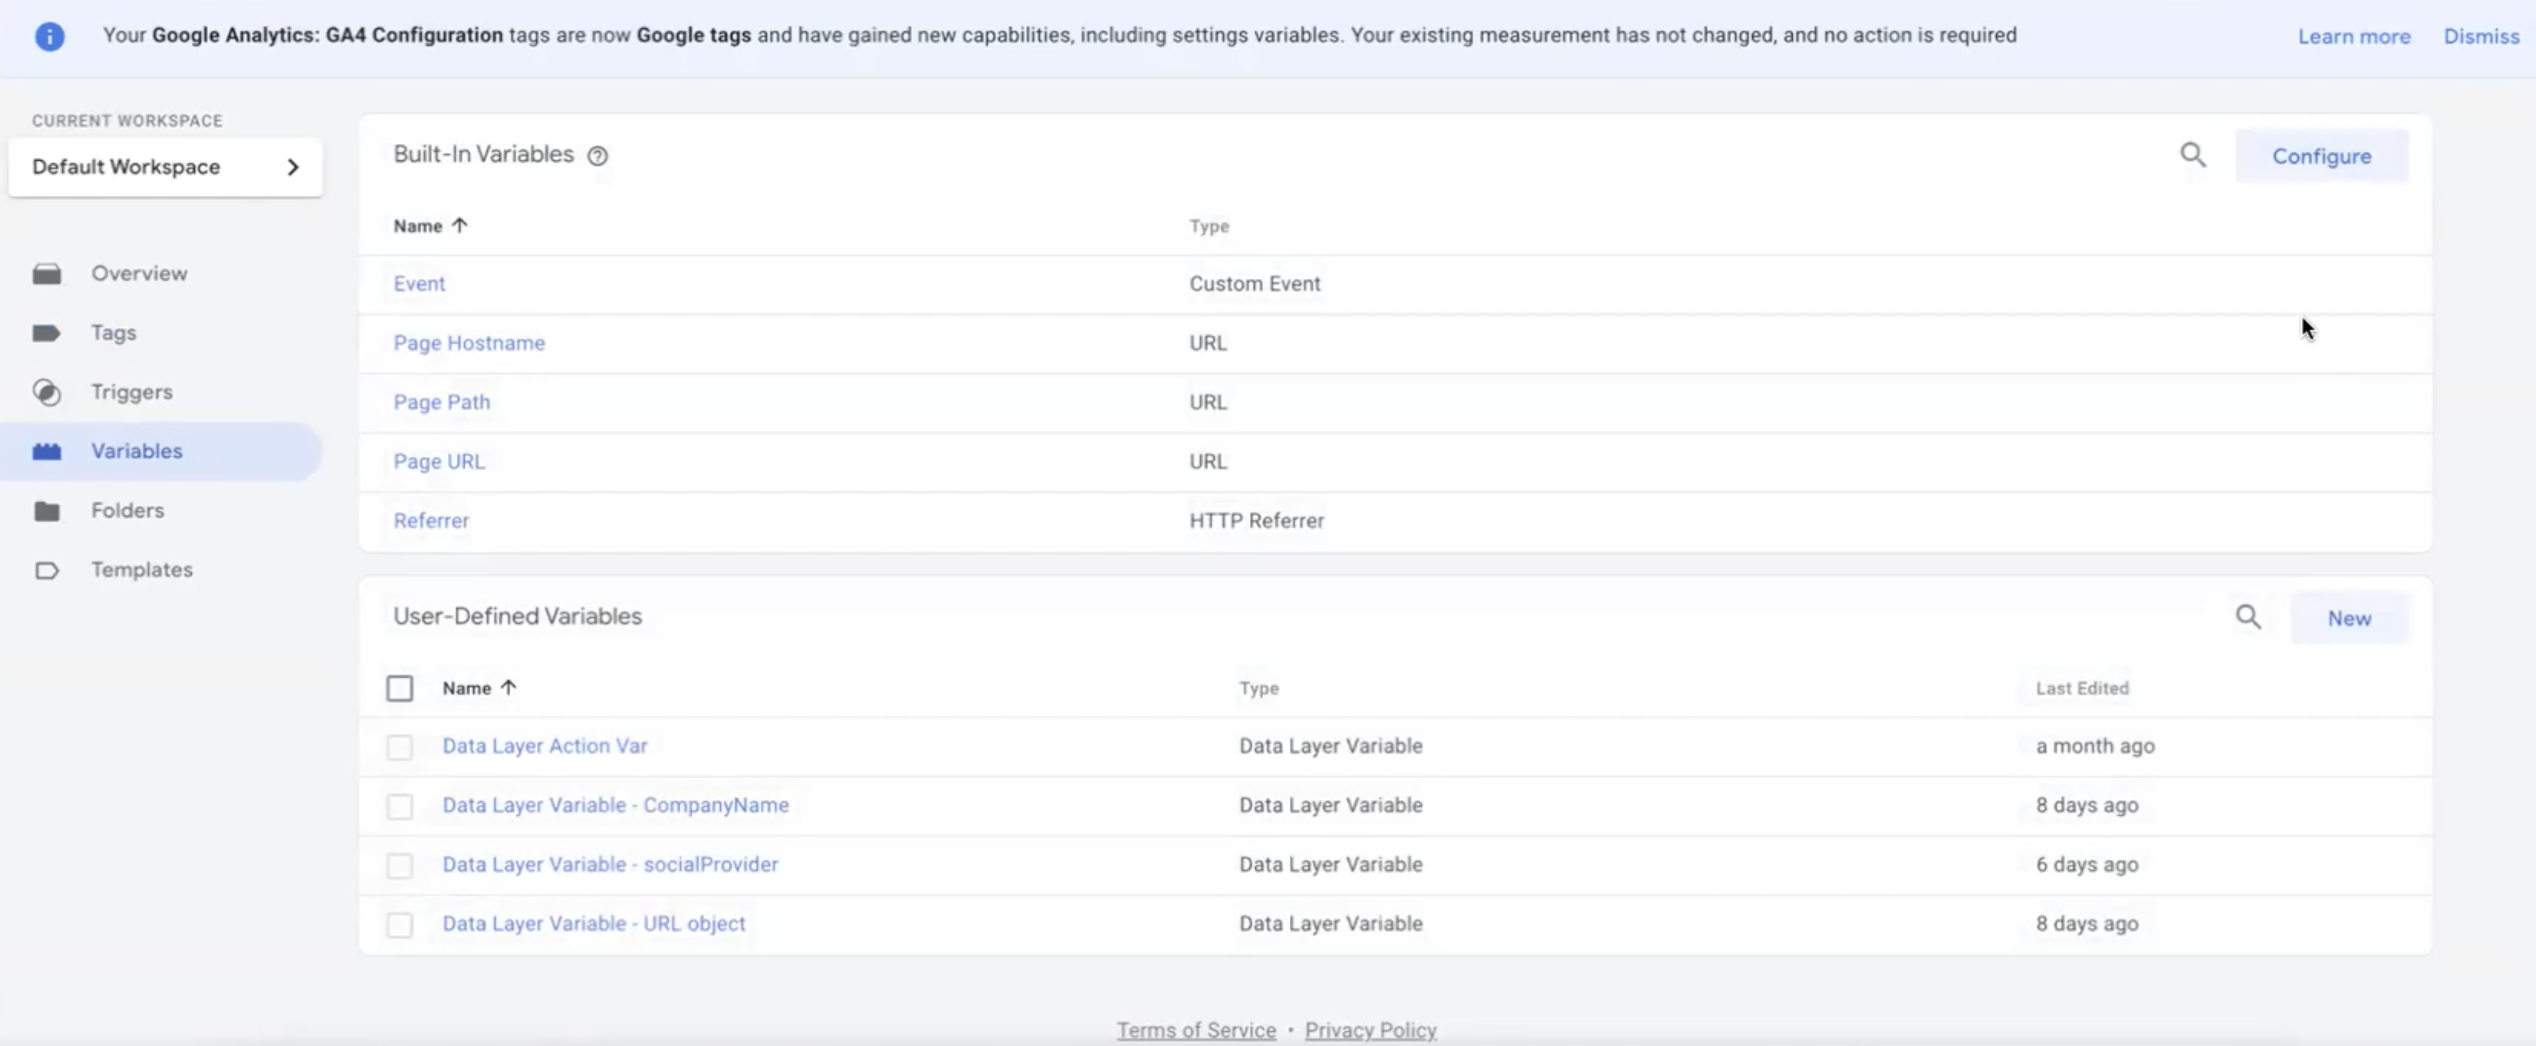
Choose Data Layer Variable as your variable type.
- Name the Variable action (this is the property name). Save the configuration.
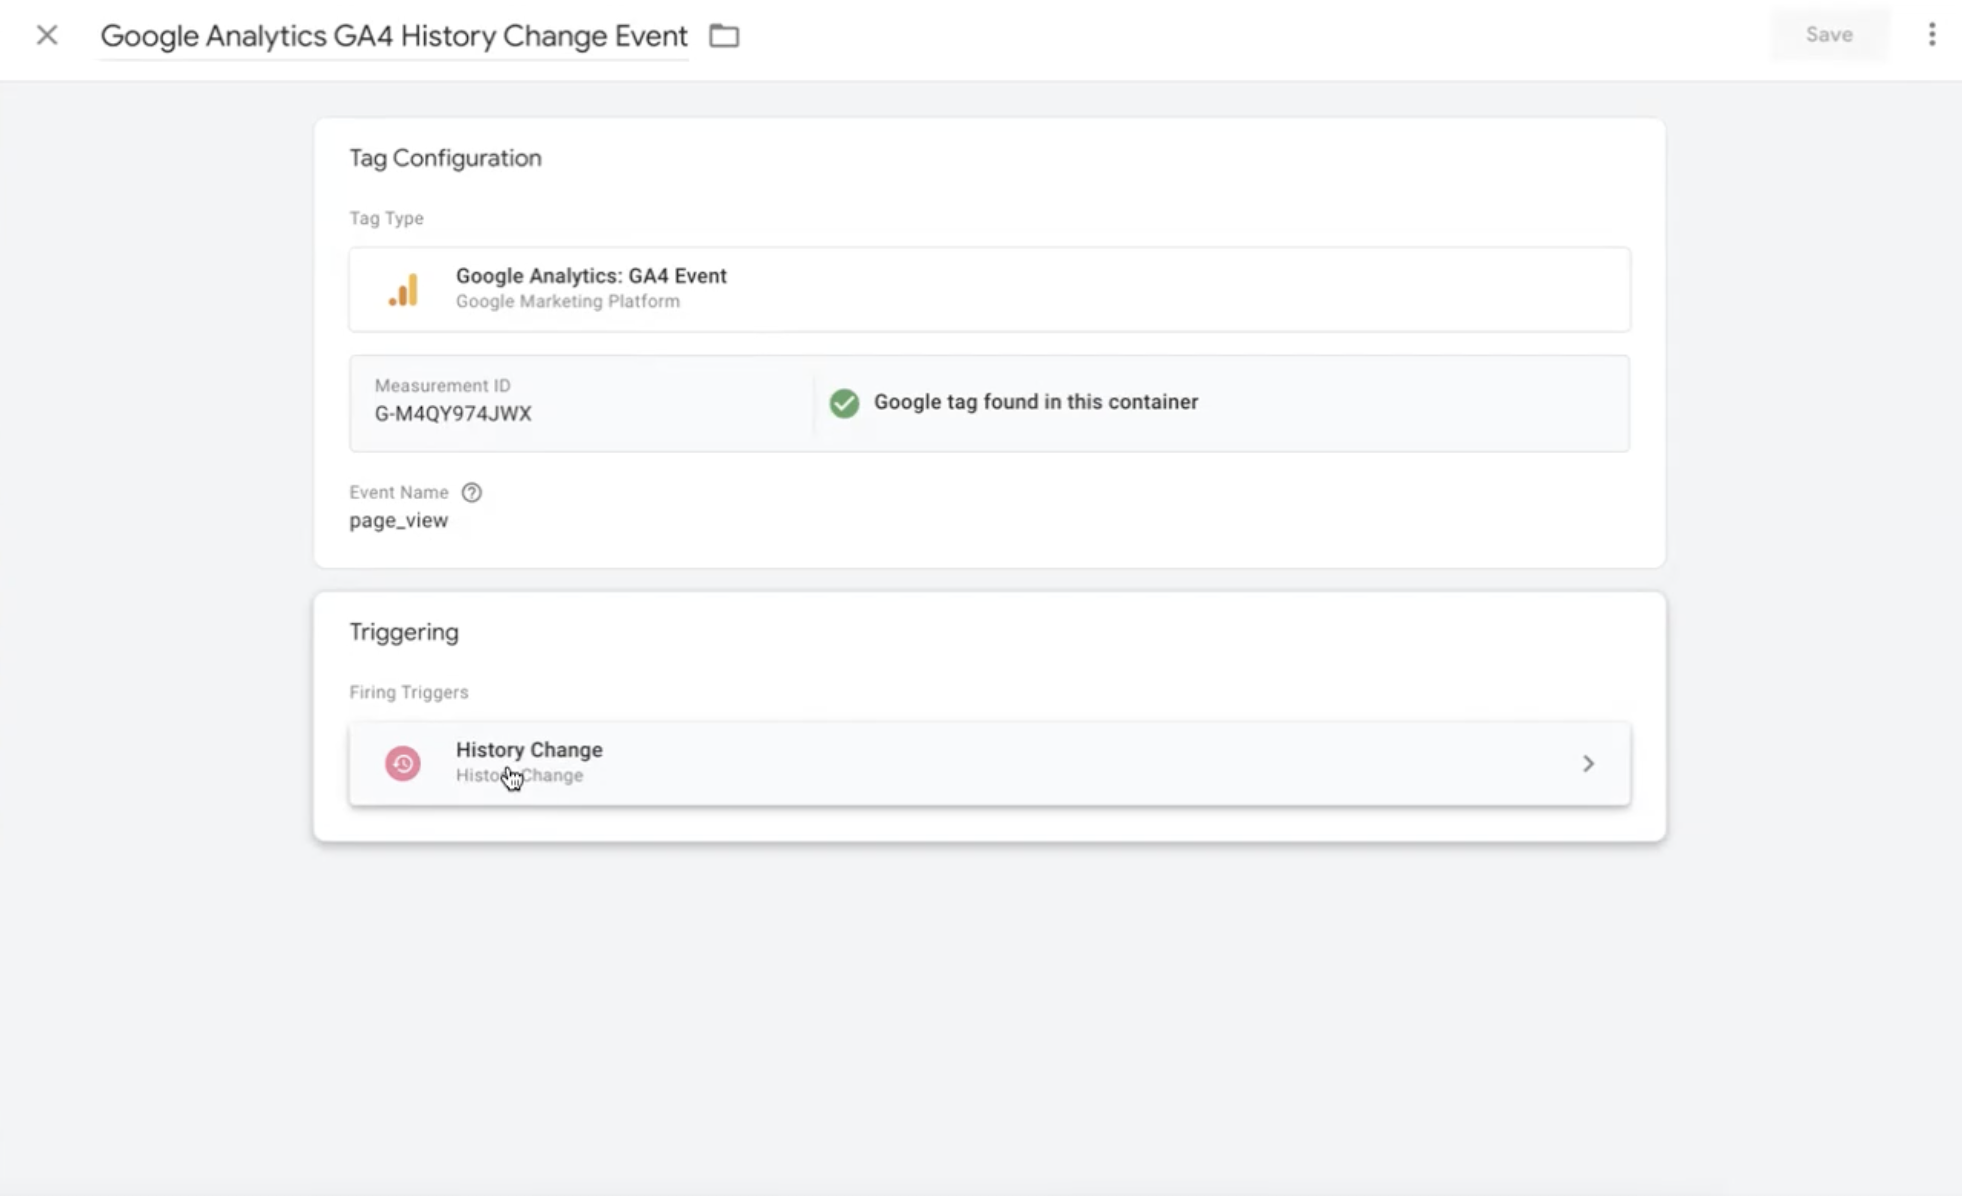
Set Google Analytics page_view Trigger
To create a new GA event trigger, do the following:
- Type - “google analytics event” (can be modified to custom HTML if you are setting it to other third party integrations).
- Choose the Measurement ID.
- Add an Event name e.g., page_view - we recommend sticking to the common GA terminology.
- Trigger - Create a History Change trigger (see below)
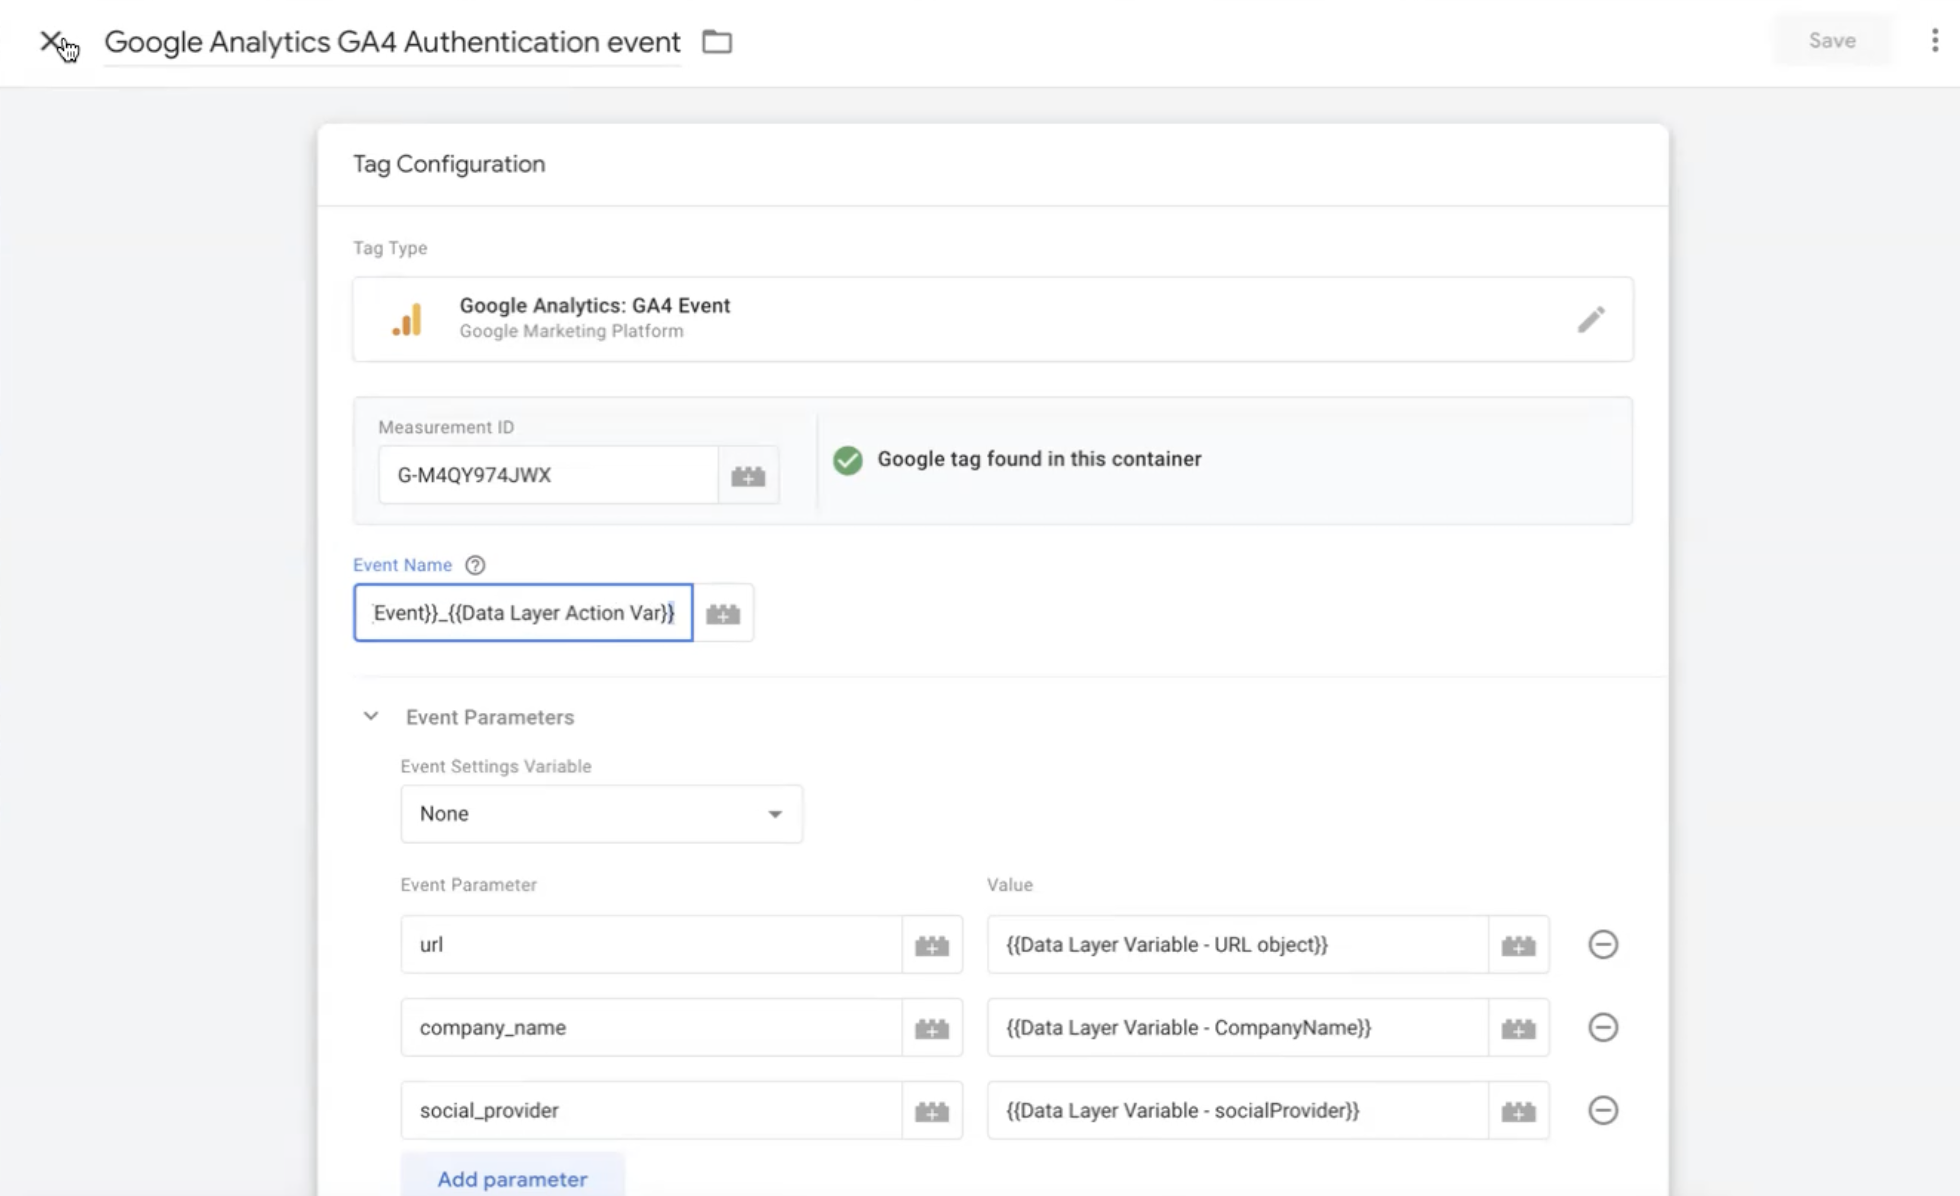
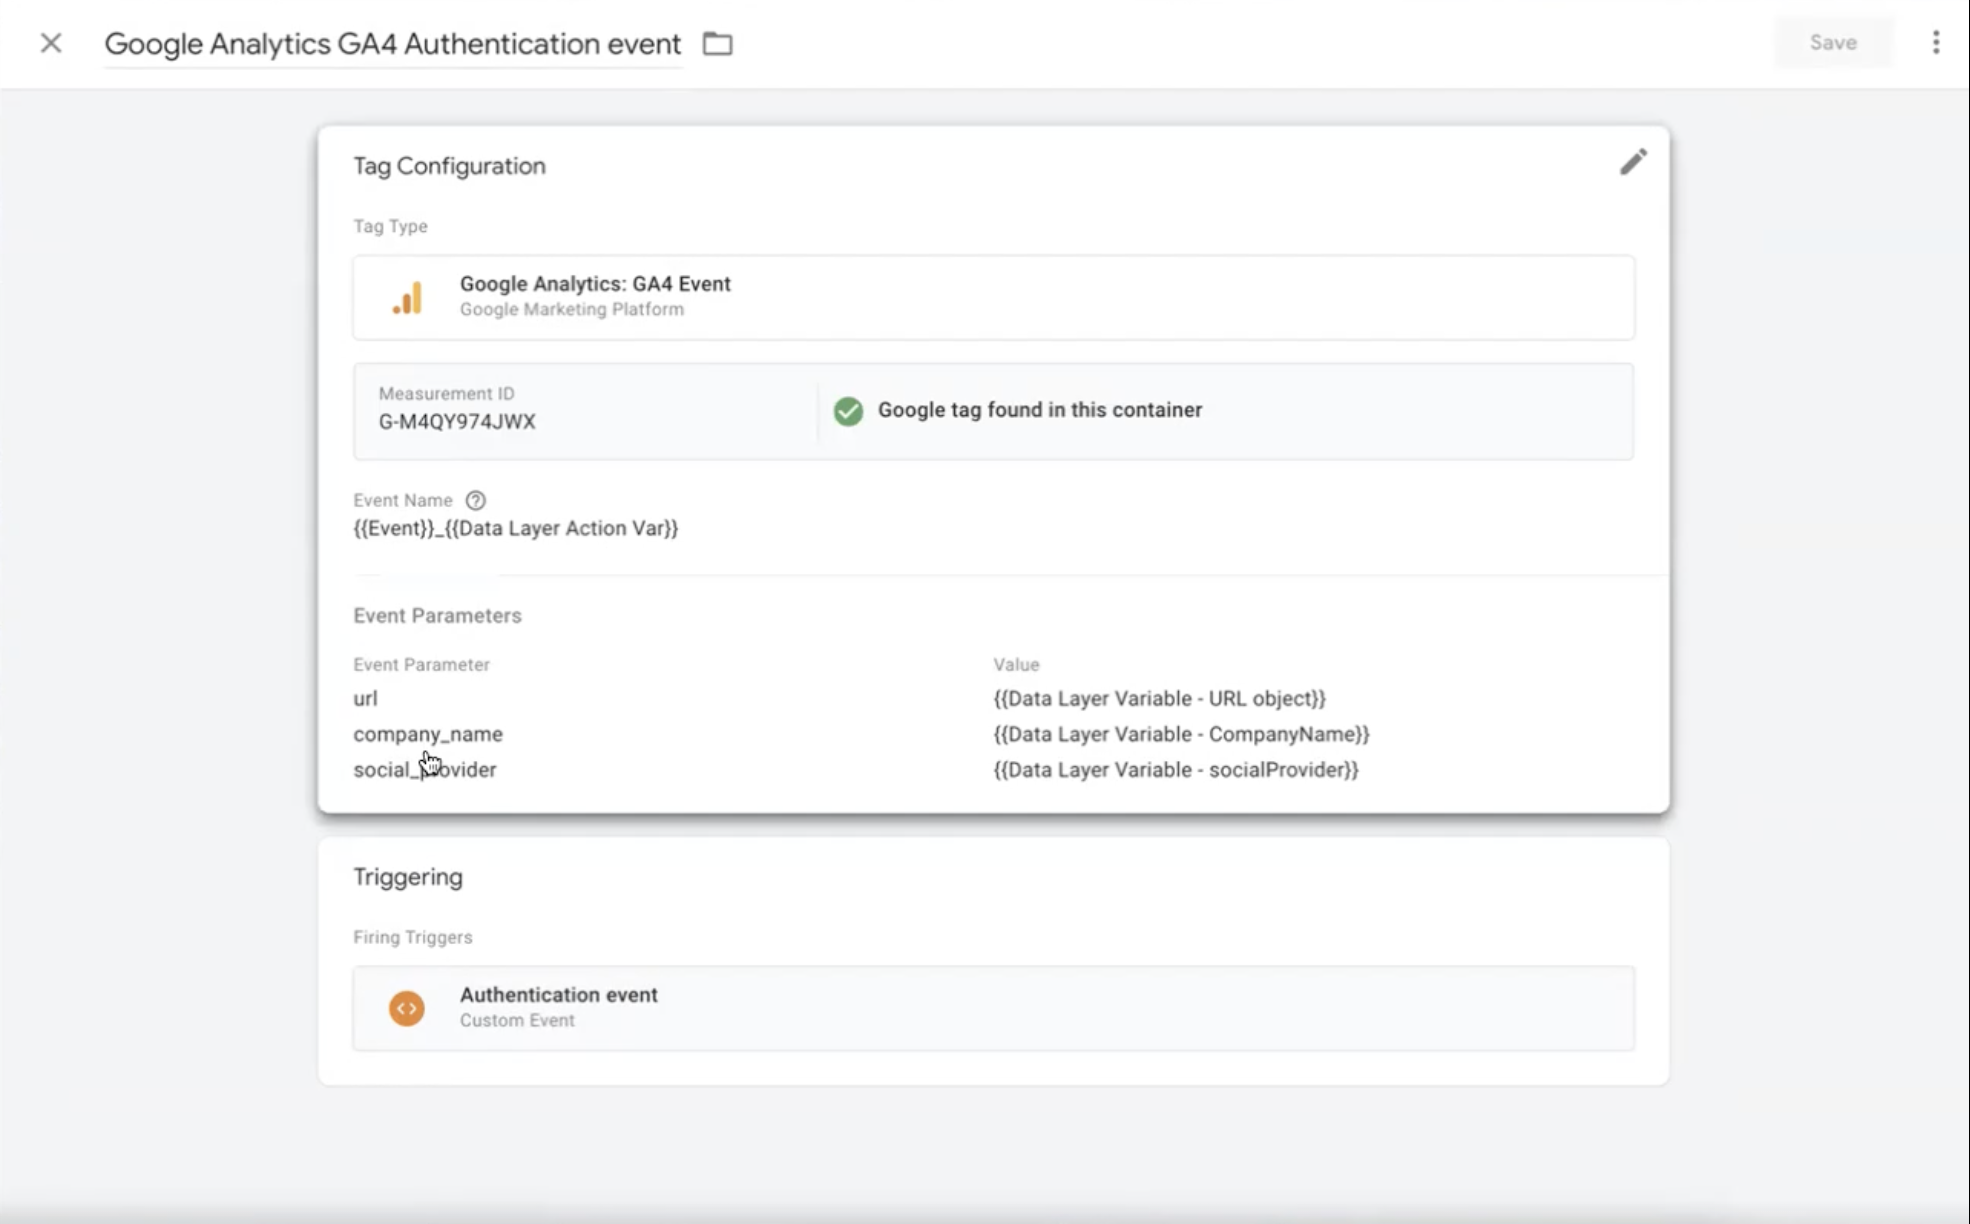
Create a Google Analytics: GA4 Event Tag
Once your variables and event triggers are set, you can create your GA tag.
- Choose a Google Analytics event type.
- Choose the relevant Measurement ID.
- Add the variable we created in the previous step within the Event Name field (the Data Layer Action variable).
- Edit the Event Parameters and corresponding values.
- Link the tag to the Authentication trigger we also created previously.
- Save and submit.
The Final tag should look somewhat like the following:
History Change Trigger
To Mark any visited page as a page view, you will need to set a History Change trigger. In Single-Page Applications (SPAs) your content is uploaded dynamically without full page reloads, so a history change trigger is used to track page views or other events within SPAs where inner pages are not reloaded.
Updated 12 days ago