Linkedin Login
Prerequisites
Required SDK versions to configure LinkedIn Login:
@frontegg/react - 6.0.26
@frontegg/vue - 3.0.18
@frontegg/angular - 6.18.0
@frontegg/nextjs - 8.0.12
Adding LinkedIn as a Social Login Provider
Adding social login methods to your login page enables users to sign in to your website or application with their existing social media accounts, thus making for a faster and more convenient login flow where users don't need to devise a new password or remember multiple passwords for each application.
The steps to enable LinkedIn social login within your app are as follows:
- Enabling LinkedIn in the Builder
- Configuring LinkedIn Credentials.
- Creating a LinkedIn Application.
- Specifying LinkedIn Scopes
Enable LinkedIn login in the Builder
- From your Frontegg portal, click the Go to Builder section.
- Toggle on LinkedIn's social login placed in the left panel (please note - you can have up to four social logins on your login page)
- Click Review to Publish button and then Publish to Dev
.png")
Configure LinkedIn credentials
First, Login to your LinkedIn developer account at https://developer.linkedin.com/
Click on the My Apps on the top right corner
.png")
Now, follow the steps below to configure a new LinkedIn application
Create a LinkedIn Application
To create your LinkedIn application, go to My Apps, and click the Create app button.
.png")
Then follow these steps
- Name your application
- Select your company's LinkedIn page from the dropdown (the company profile must exist on LinkedIn)
- Set your link to the privacy policy (optional)
- Select your company’s logo
- Accept the terms of service
- Click on the Create app button
.png")
Your application is now created.
Under the Products tab, request access on the “Sign in with LinkedIn Using OpenID Connect” tab. This will allow your users to log in to your product via LinkedIn
This is how the products section should look after granting access to the Sign In with LinkedIn
.png")
Under the Auth tab, Navigate to the OAuth 2.0 section to add your environment login redirect URL to the allowed redirect URLs as follows:
.png")
- For hosted login, the redirect URL should be https://{{YOUR-FRONTEGG-DOMAIN}}/oauth/account/social/success.
- For embedded login, the redirect URL should be https://{{YOUR-APPLICATION-URL}}/account/social/success.
.png")
Store the Client ID and Client Secret from the Application Credentials section.
We will use them in the next step.
.png")
Step 2: Configure LinkedIn Provider in Frontegg
We are almost done!
Now all that is left is to copy the credentials to Frontegg’s portal.
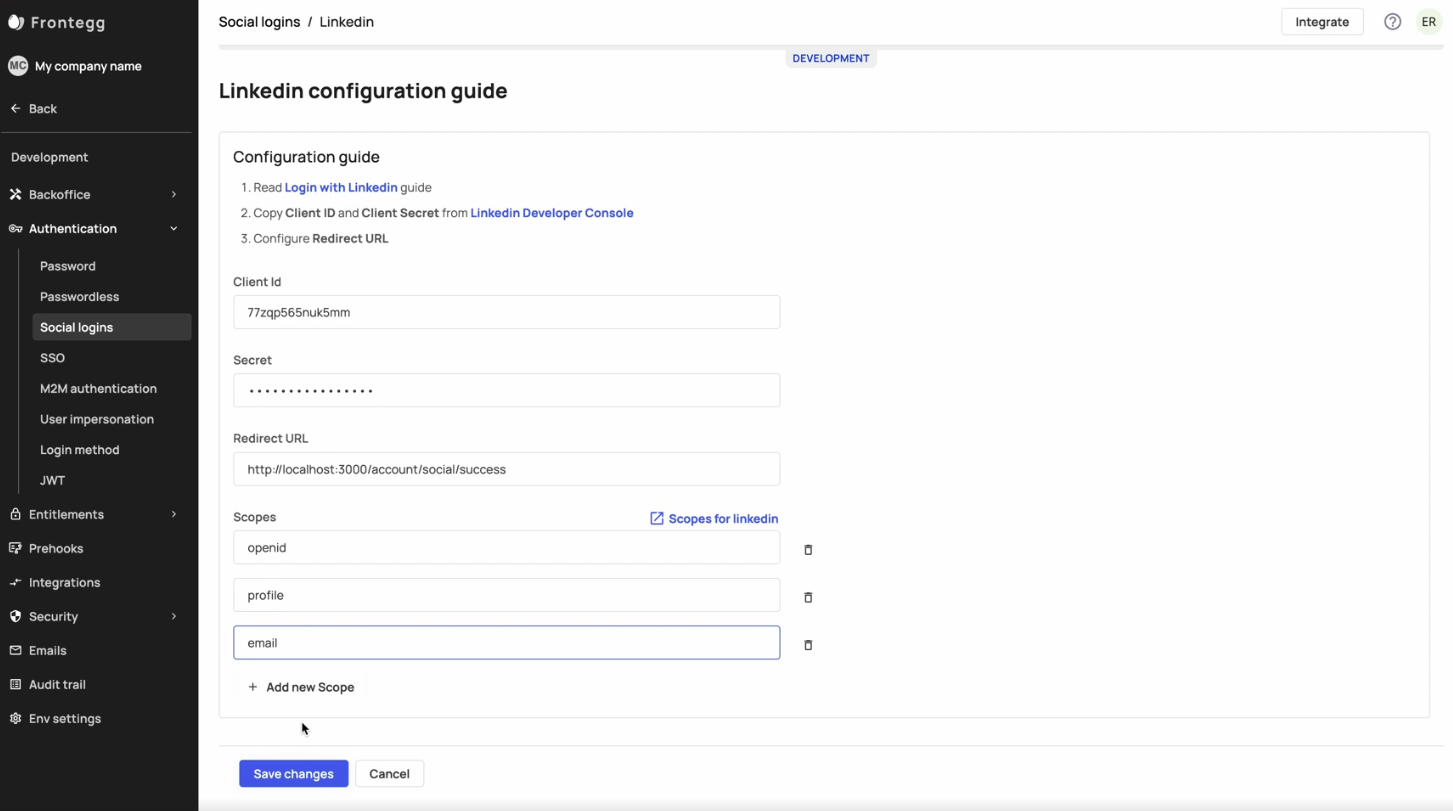
- Go to the social logins page in Frontegg’s portal under Authentication → Social-Logins, and click on Manage on the LinkedIn card.
.png")
-
Choose Custom and start copying the credentials you wrote down
-
Under Client ID paste the Client ID you created in the previous step
-
Under Secret paste the Client Secret you created in the previous step
-
Under Redirect URL paste the redirect url to which you want the user to be redirected to after a successful login
Don’t forget to save your changes!
-
.png")
Adding Authentication Scopes for LinkedIn
Scopes let you specify the information your application can fetch from your users after they are granted access— and the generated access token will subsequently include the scopes you specified.
To ensure that the user can successfully login with their LinkedIn credentials, you must fetch the following OAuth 2.0 scopes and add them to your app: openid, profile, and email.
Congrats! You just enabled LinkedIn as a social login, and your users can now use their LinkedIn identity to login into your app
Test your integration
- Go to your application
- Login/Sign-up using LinkedIn
Updated 10 months ago