Frontegg offers seamless support for importing passwords hashed with Bcrypt, Scrypt, and Firebase methods, simplifying the process of transitioning users from your previous authentication vendor. If your previous vendor utilized any of these hashing techniques, migrating users with their passwords becomes a straightforward task. In cases where your previous vendor used a different hashing method, Frontegg ensures a smooth transition, prompting users to reset their passwords, a recommended security practice.
For those looking to minimize friction and enhance user experience, Frontegg offers an alternative in the form of Passwordless Authentication. This method eliminates the need for traditional passwords, offering a convenient and secure approach to user access. The migration process is facilitated through Frontegg's APIs, requiring the acquisition of a vendor JWT.
Prerequisites
Migrating users to your Frontegg account is done via API and therefore requires the acquisition of a vendor JWT (JSON Web Token). Detailed steps on how to authenticate your environment and obtain a vendor JWT can be found here.
Migrating Users from Auth0
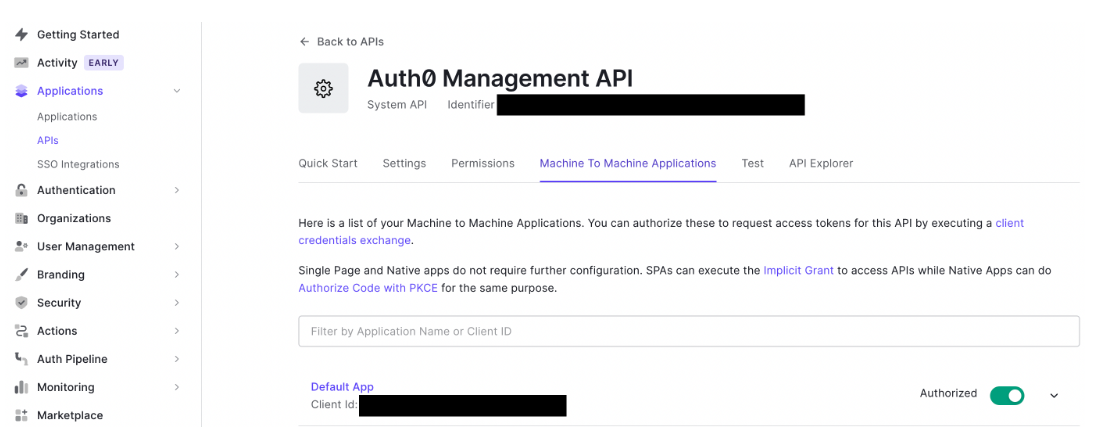
To migrate users from Auth0:
- Recreate your Tenants / Accounts on Auth0 using one of the methods mentioned in the
Migrate Accountsbelow. - In Auth0, go to Applications > API section > System API:

Auth0 Requirements and Prerequisites
- Your Auth0 application will need to possess the following permissions:
read:users,read:user_idp_tokens,read:roles. Check for your existing permissions via the/api/v2/client-grantsendpoint on Auth0. - Ensure your management API has your application listed under Machine to Machine Applications.
- If any of these permissions are missing, make sure to update the grant via
/api/v2/client-grants/{id}and use the ID received from the previous GET request with the following payload:
{"scope":[
  "read:users",
  "read:user_idp_tokens",
  "read:roles"
]}
Metadata Fields on Frontegg
Note that Frontegg searches for fields that refers to the user's tenant in either
app_metadataoruser_metadata(see raw user object below).
Migrating a user
Use the following raw user object:
{
    "email": "[[email protected]](mailto:[email protected])",
    "email_verified": true,
    "family_name": "Doe",
    "given_name": "John",
    "identities": [
        {
            "connection": "Username-Password-Authentication",
            "user_id": "xxxxx",
            "provider": "auth0",
            "isSocial": false
        }
    ],
    "name": "Frontegg Test",
    "user_id": "auth0|xxxxxxx",
    "username": "Test",
    "user_metadata": {},
    "app_metadata": {
        "tenant_id": "Frontegg_Test"
    }
}
Send a POST request to the Migrate from Auth0 route with the following sample payload:
{
     "isTenantIdOnUserMetadata": false,
     "domain": "https\://[your-auth0-subdomain]",
     "clientId": "your-auth0-client-ID",
     "secret": "your-auth0-secret",
     "tenantIdFieldName": "tenant_id"
}
Domain Format
When copying your domain address from Auth0, it may be missing the
https\://in the value.Make sure you add the
https\://into the value of the domain, like so:
https\://[your-auth0-subdomain]
The following user object will be created on Frontegg:
{
"id": "xxxxx",
"sub": "xxxxx",
"email": "[[email protected]](mailto:[email protected])",
"verified": null,
"name": "Frontegg Test",
"phoneNumber": null,
"profilePictureUrl": "xxx",
"provider": "local",
"mfaEnrolled": false,
"metadata": "{\"tenantIdFieldName\":\"Frontegg_Test\",\"auth0_id\":\"auth0|xxxxxxx\"}",
"tenantIds": ["Frontegg_Test"],
"tenantId": "Frontegg_Test",
"roles": \[],
"permissions": \[],
"createdAt": "2023-01-05T09:37:03.000Z",
"lastLogin": null,
"isLocked": false,
"tenants": \[{
"tenantId": "Frontegg_Test",
"roles": \[]
}],
"managedBy": "frontegg",
"activatedForTenant": true
}
That's it! Frontegg will create a user and assign the user to the tenant with the same ID that appears under thetenant_id field.
Migrating Users Using Passwords
-
Recreate the Tenants / Accounts previously had within the environment you'd like to migrate the users to (use one of the methods mentioned in the
Migrate Accountssection in this topic). -
Obtain your vendor JWT on Frontegg, per the instructions here.
-
Send a POST request to Migrate a vendor user route with one of the below options, using the migrate single user endpoint.
To migrate users with Bcrypt passwords, send the following payload:
{
"name": "BCrypt Test User"
"metadata": "{\"Test\":\"Test\"}",
"verifyUser": true,
"email": "[[email protected]](mailto:[email protected])",
"tenantId": "Frontegg_Test",
"passwordHash": "[hashed-password]",
"passwordHashType": "bcrypt"
}
To migrate users with Scrypt passwords, send the following payload:
{
"name": "SCrypt Test User",
"metadata": "{\"Test\":\"Test\"}",
"email": "[[email protected]](mailto:[email protected])",
"verifyUser": true,
"tenantId": "Frontegg_Test",
"passwordHash":"[salt-value];[hex-hashed-password]",
"passwordHashType": "scrypt",
"passwordHashConfig":"{\"saltSeparator\":\";\",\"N\":16384,\"r\":8,\"p\":1,\"keyLen\":64}"
}
Note that metadata will be used as the user metadata in Frontegg. You can also send an empty stringified object.
To migrate users with Firebase passwords, send the following payload:
{
"name": "SCrypt Test User",
"metadata": "{\"Test\":\"Test\"}",
"email": "[[email protected]]",
"verifyUser": true,
"tenantId": "Frontegg_Test",
"passwordHash":"[hashed-password]",
"passwordHashType": "firebase-scrypt",
"passwordHashConfig":"{\"saltSeparator\":\";\",\"signerKey\":"",\"memCost\":14,\"rounds\":8}"
}
To migrate users with pbkdf2, send the following payload:
{
"name": "pbkdf2 Test User",
"metadata": "{\"Test\":\"Test\"}",
"email": "[[email protected]]",
"verifyUser": true,
"tenantId": "Frontegg_Test",
"passwordHash":"[salt-phrase];[hashed-password]",
"passwordHashType": "pbkdf2",
"passwordHashConfig":"{\"saltSeparator\":\";\",\"iterations\":1000,\"keyLen\":32,\"digest\":\"sha256\"}"
}
To migrate users with pbkdf2 from Keycloak, send the following payload:
{
"name": "Keycloak pbkdf2 Test User",
"provider": "local",
"verifyUser": true,
"email": "[[email protected]]",
"tenantId": "Frontegg_Test",
"passwordHash": "[salt-phrase];[base64-hashed-password]",
"passwordHashType": "pbkdf2",
"passwordHashConfig": "{\"saltSeparator\":\";\",\"iterations\":27500,\"keyLen\":32,\"digest\":\"sha256\", \"keyEncodingType\":\"base64\", \"keyEncodingType\":\"base64\"}"
 // change iterations, keyLen, according to what is provided by Keycloak export
}
pbkdf2 passwordHashConfig
The default configuration expects a hex hashed value. The following attributes can be used to pass values which are encoded differently:
keyEncodingType,saltEncodingType| "ascii"
| "utf8"
| "utf-8"
| "utf16le"
| "ucs2"
| "ucs-2"
| "base64"
| "latin1"
| "binary"
| "hex"
Migrating & Inviting Users in Bulk
Frontegg's Bulk Invitation APIs allow you to migrate and invite users to tenants in batches of up to 1000 users.
Migrating Users in Bulk (Using Passwords)
-
Recreate the Tenants / Accounts previously had within the environment you'd like to migrate the users to (use one of the methods mentioned in the
Migrate Accountssection in this topic). -
To migrate users in batches of 1000 at a time, send an Authorization POST request with your vendor token to the migrate users in bulk endpoint. The payload of the users' data can contain any of the attributes mentioned in the single-user migration examples mentioned in the Migrating Users Using Passwords section.
curl --location --request POST '<https://api.frontegg.com/identity/resources/migrations/v1/local/bulk>' \
--header 'Authorization: Bearer <<vendor-JWT>>' \
--header 'Content-Type: application/json' \
--data-raw '{
    "users": [{
       "email": "[email protected]",
       "tenantId": "123456"
    }, {
       "email": "[email protected]",
       "tenantId": "123456"
    }, {
       "email": "[email protected]",
       "tenantId": "123456"
    }]
    }'
- In the response, you will get a
migrationId. Use thisidto monitor the status of the migration, via sending a GET request to the dedicated endpoint.
Email verification:
If you have email verification enabled on the environment, pass
verifyUserastruein order to make sure that migrated users are being marked as verified automatically.
Migrating Accounts
To migrate accounts to Frontegg, go to the environment you'd like to create your new accounts under; Then, choose to either recreate tenants via your backoffice, or via the tenant creation API. Alternatively, you can Migrate Accounts in Bulk as indicated in the next section:
- Recreate tenants using the Backoffice UI . Use the same Tenant ID that you have for a different vendor and insert it under the
IDfield.

- Recreate Tenants via the tenant creation API. Make sure to set your previous tenant ID as the
tenantIdproperty.
Migrate Accounts in Bulk
The tenant migration API allows you to migrate tenants in batches of 1000 users per batch.
Send a POST request with your vendor token for authorization to the following endpoint:
curl --location --request POST 'https://api.frontegg.com/tenants/resources/migrations/v1/tenants' \
--header 'Authorization: Bearer <<vendor-JWT>>' \
--header 'Content-Type: application/json' \
--data-raw '{
  "tenants": [{
   "tenantId": "your-tenant-id",
   "name": "Test_Tenant_1"
},
{
   "tenantId": "your-tenant-id2",
   "name": "Test_Tenant_2"
},
{
  "tenantId": "your-tenant-id3",
  "name": "Test_Tenant_3"
}]
}'
In the response, you will get a migrationId. Use this id to monitor the status of the migration by sending a GET request to the following endpoint.https://api.frontegg.com/tenants/resources/migrations/v1/tenants/status/{{migrationId}}.
Inviting Users in Bulk
Our Bulk Invitation API allows you to create up to 1000 users within a single tenant. If users already exist under one tenant - they will be added to the new tenant, with the same user properties already in the system (they will not be overridden by the new request, but will be copied to the new tenant).
Learn more about our User Bulk Invitation.
Updated 2 months ago