Configuring SAML for Vendors and Customers
Follow the instructions below to learn how to configure SSO for the SAML 2.0 standard.
Configure SAML in Frontegg Portal
Go to Environments ➜ [NAME OF ENVIRONMENT] ➜ Authentication ➜ SSO.
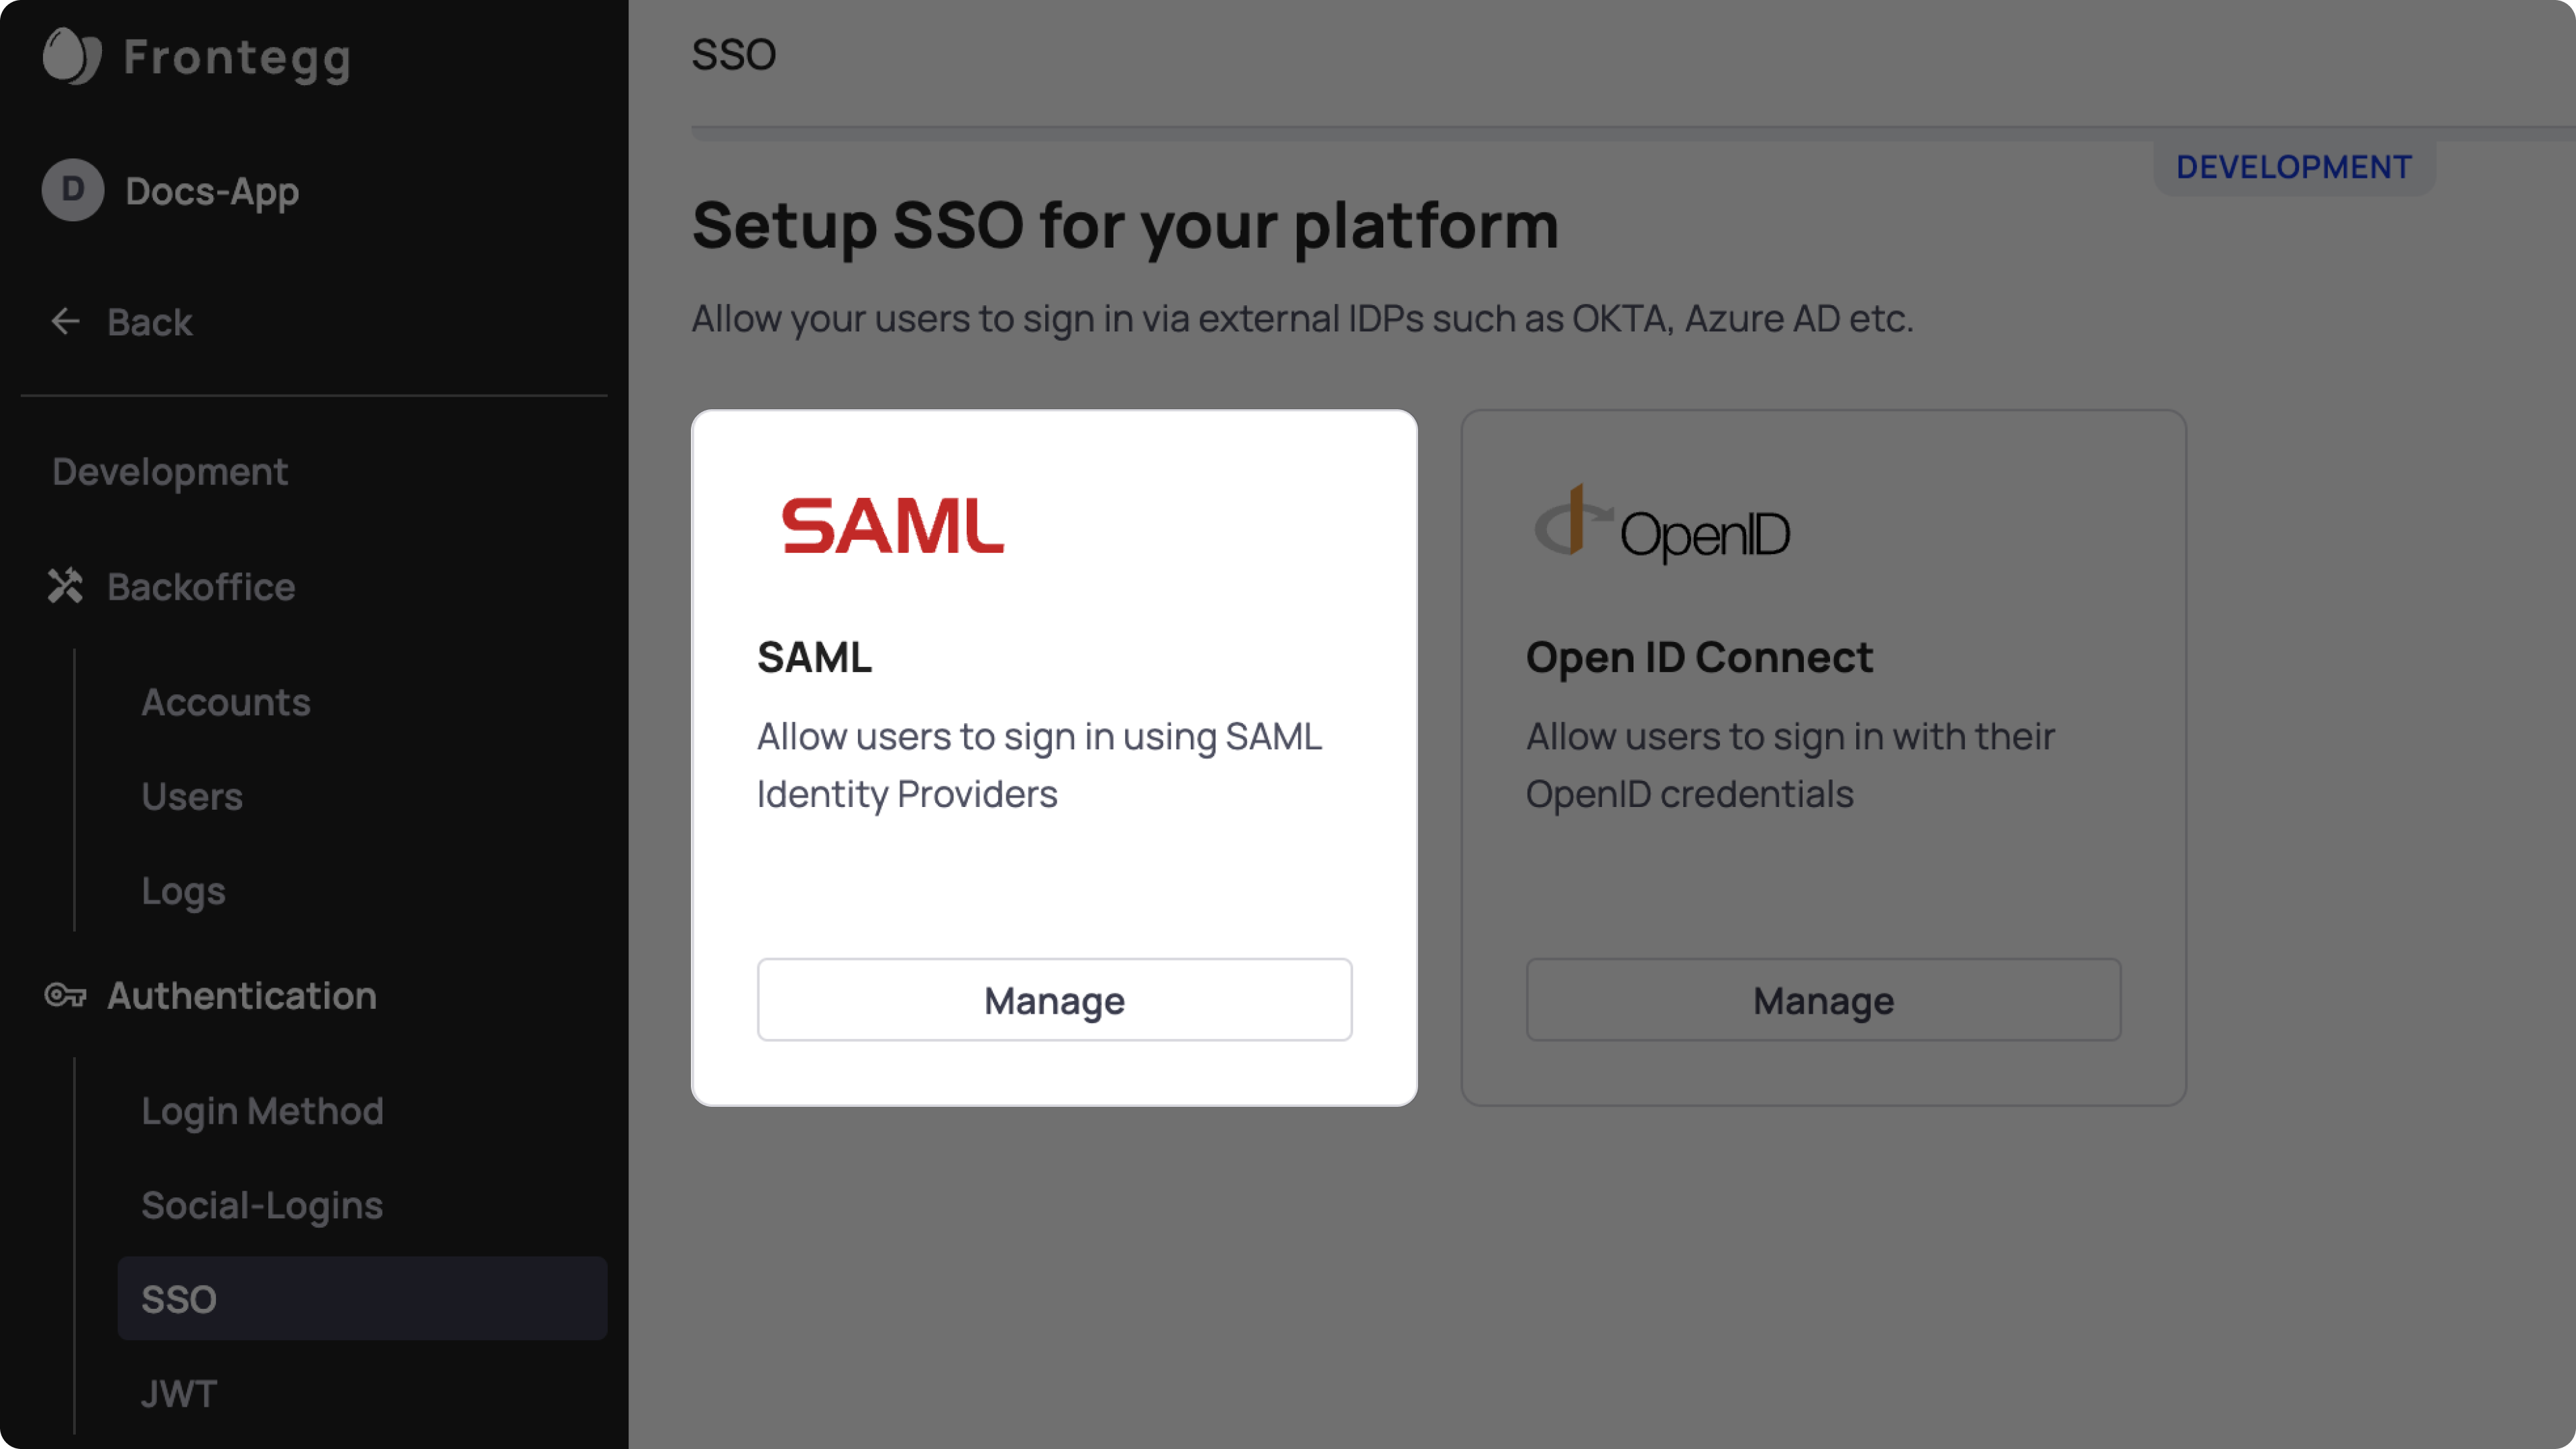
If you do not see SSO ➜ SAML in the sidebar, make sure it is enabled and published to the environment.
After clicking the SAML configure button, complete the form on the following page.

ACS URL
Enter your frontegg subdomain followed by /auth/saml/callback. For example, if your Frontegg workspace URL is https://acme.frontegg.com, enter as your ACS URL https://acme.frontegg.com/auth/saml/callback.
When using a custom domain:
If you've configured a custom domain on Frontegg, use that domain instead of the
frontegg subdomainboth for ACS URL and for the Redirect URL (if you're using hosted login).
SP Entity ID
Customers use this value when they configure their identity provider. We recommend you to use the name of your application.
Redirect URL
If you are using the Hosted Login method, add the Redirect URL as https://[your-frontegg-domain].frontegg.com/oauth/account/saml/callback?redirectUrl=[your-application-url], i.e., https://acme.frontegg.com/oauth/account/saml/callback?redirectUrl=https://app.acme.com.
If you are using the Embedded Login method, add the Redirect URL as [your-application-url]/account/saml/callback i.e. http://localhost:3000/account/saml/callback, i.e., https:/app.acme.com/account/saml/callback.
Allow your customers to apply the connection or apply it for them
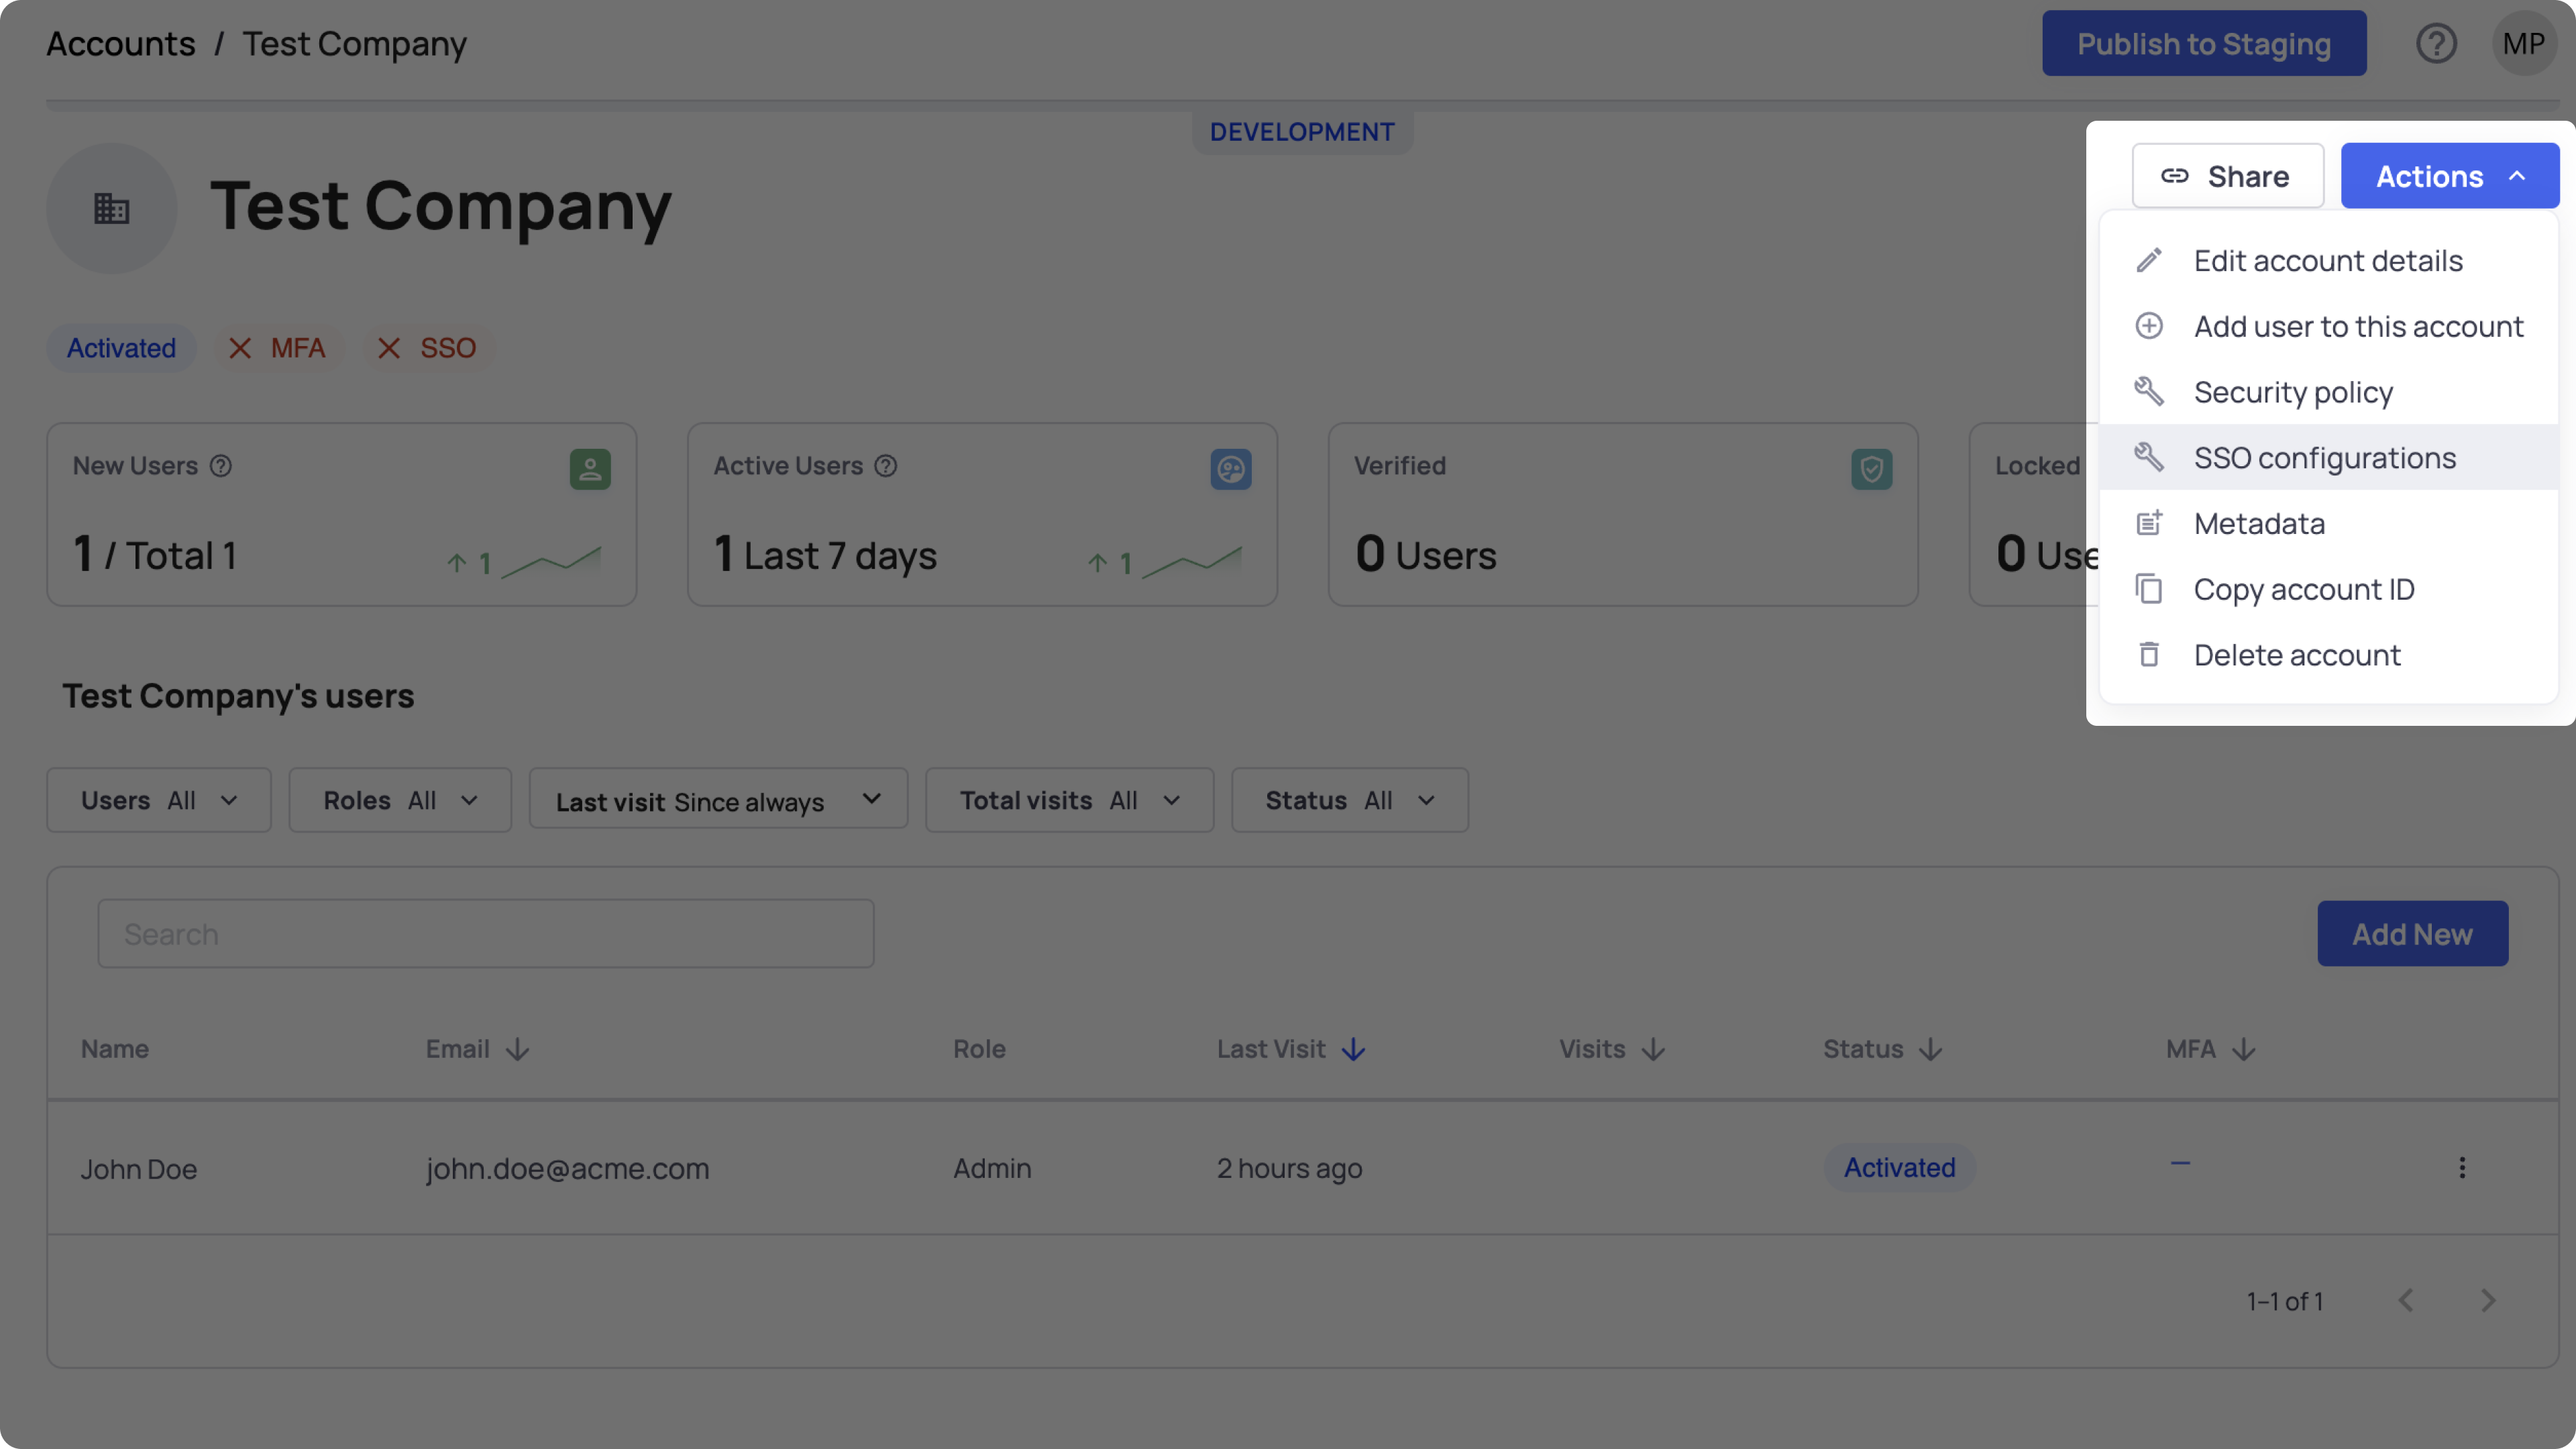
After configuring SAML in the Frontegg Portal, you can allow your end users either to apply the SSO connection via the Self-service or apply the connection details from their IDP on their behalf, via the Backoffice ➜ Accounts ➜ Account ➜ Actions SSO ➜ Configurations.
Enable SSO Tab in the Admin portal
For enabling the SSO tab in the Self-Service for your end users:
Admin portal integration
Make sure that you have integrated the Admin portal into your application as described in (doc:react-self-service).

After the SSO tab is enabled, your customers can follow the instructions for adding the details of the connection from the IDP - here.
Apply the connection from the Environment Backoffice
For applying the SSO connection on behalf of your customers, you can use the Backoffice or do it by using our APIs.
In order to be able to log in via SAML SSO, SAML needs to be enabled on the application login and configured.
Customer SAML Configuration
If SAML is enabled and configured, an end user can configure an SSO connection and allow other users to sign in to the account using SAML SSO.
STEP 1: Create a New SAML Application
Create a new SAML application with Okta that you can use as the Identity Provider for users.
Below is an example with Okta.

STEP 2: Find Admin Portal
Go to the Admin Portal ➜ SSO

STEP 3: Configure IDP
Click the add new button to configure the type of connection and the Identity Provider by filling out the details or uploading a metadata file from the identity provider.

We recommend selecting the automatic option. It is the same as manual but less prone to implementation errors.
After selecting automatic, you will need to upload the XML file from the identity provider.
Okta will require information from the Service Provider, ACS URL, and Entity ID. See the example below.
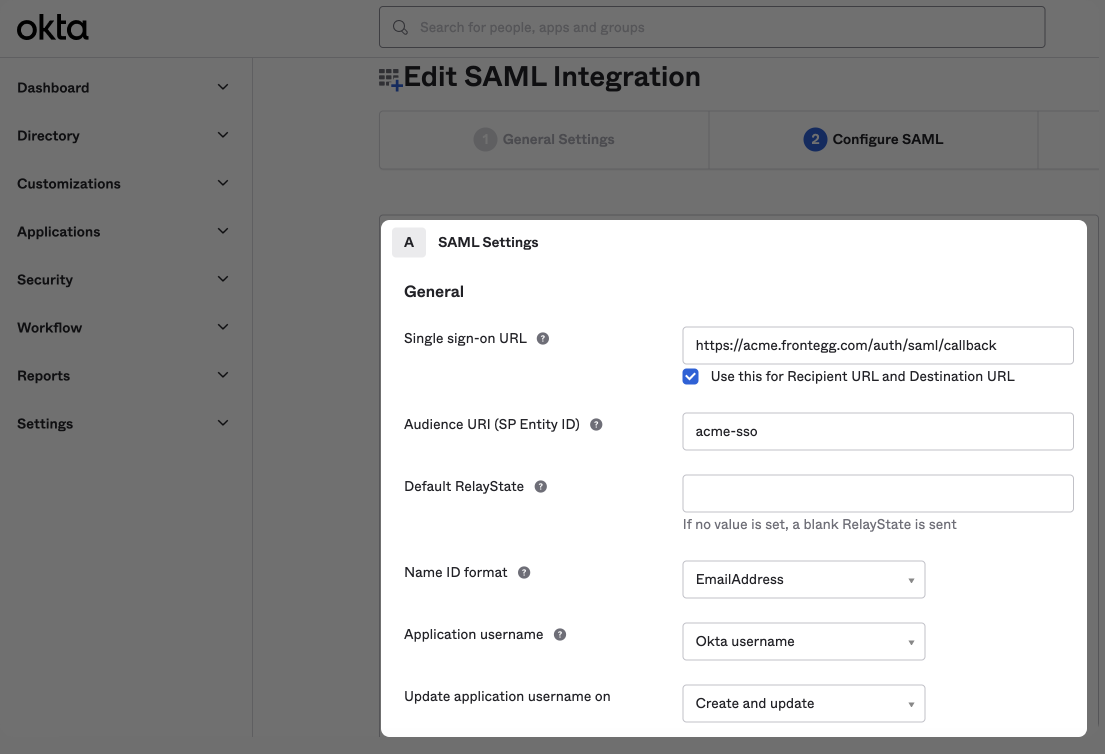
Open the new SSO configuration modal on Admin portal and use the values for ACS URL under the SSO URL on Okta (other IDP). this would be a domain followed by /auth/saml/callback. For the SP Entity ID, enter the Entity ID from the Admin portal.
Choose the Name ID format of EmailAddress and Application username as Okta username.
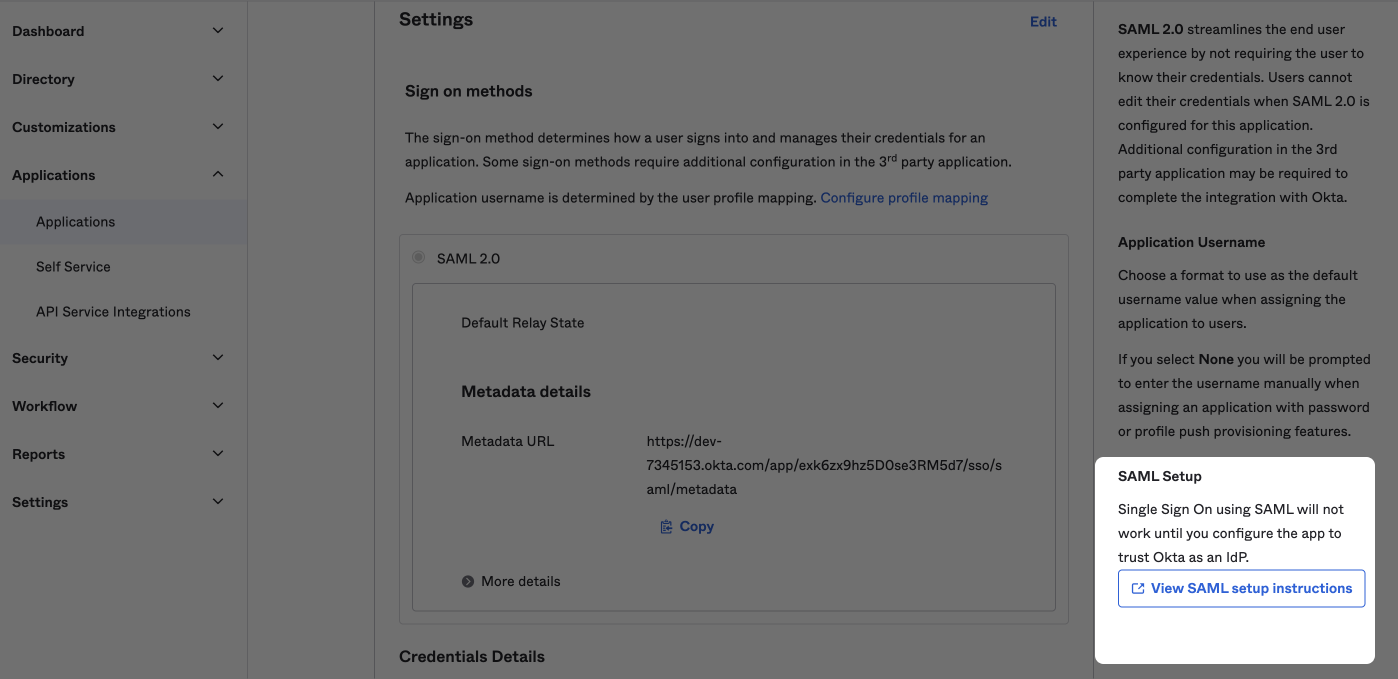
STEP 4: Transfer XML
The final step is to transfer an XML file from the identity provider to Admin portal. To do that, first, download the metadata XML from the Identity Provider (Okta).
Next, upload the XML file to the Admin portal.
If the IDP does not offer an XML download, the user may need to copy the XML data from the IDP and save it to an .xml file then upload that file to the Admin Portal.
If selected manual, you'll need to enter the SSO Endpoint and Public Certificate from the identity provider
STEP 5: Claim Domain
After configuring the identity provider, you will need to claim one or more domains for the account. This step is required in order to avoid abuse of a domain.

The domain needs to be claimed by copying the TXT record and applying it to your DNS provider. If you cannot obtain access to your organization's DNS, please contact your application Administrator.
You can configure multiple domains for an account. This can be useful if you're using multiple environments for development or multiple production applications on separate domains and need the SSO connection to cover several domains.

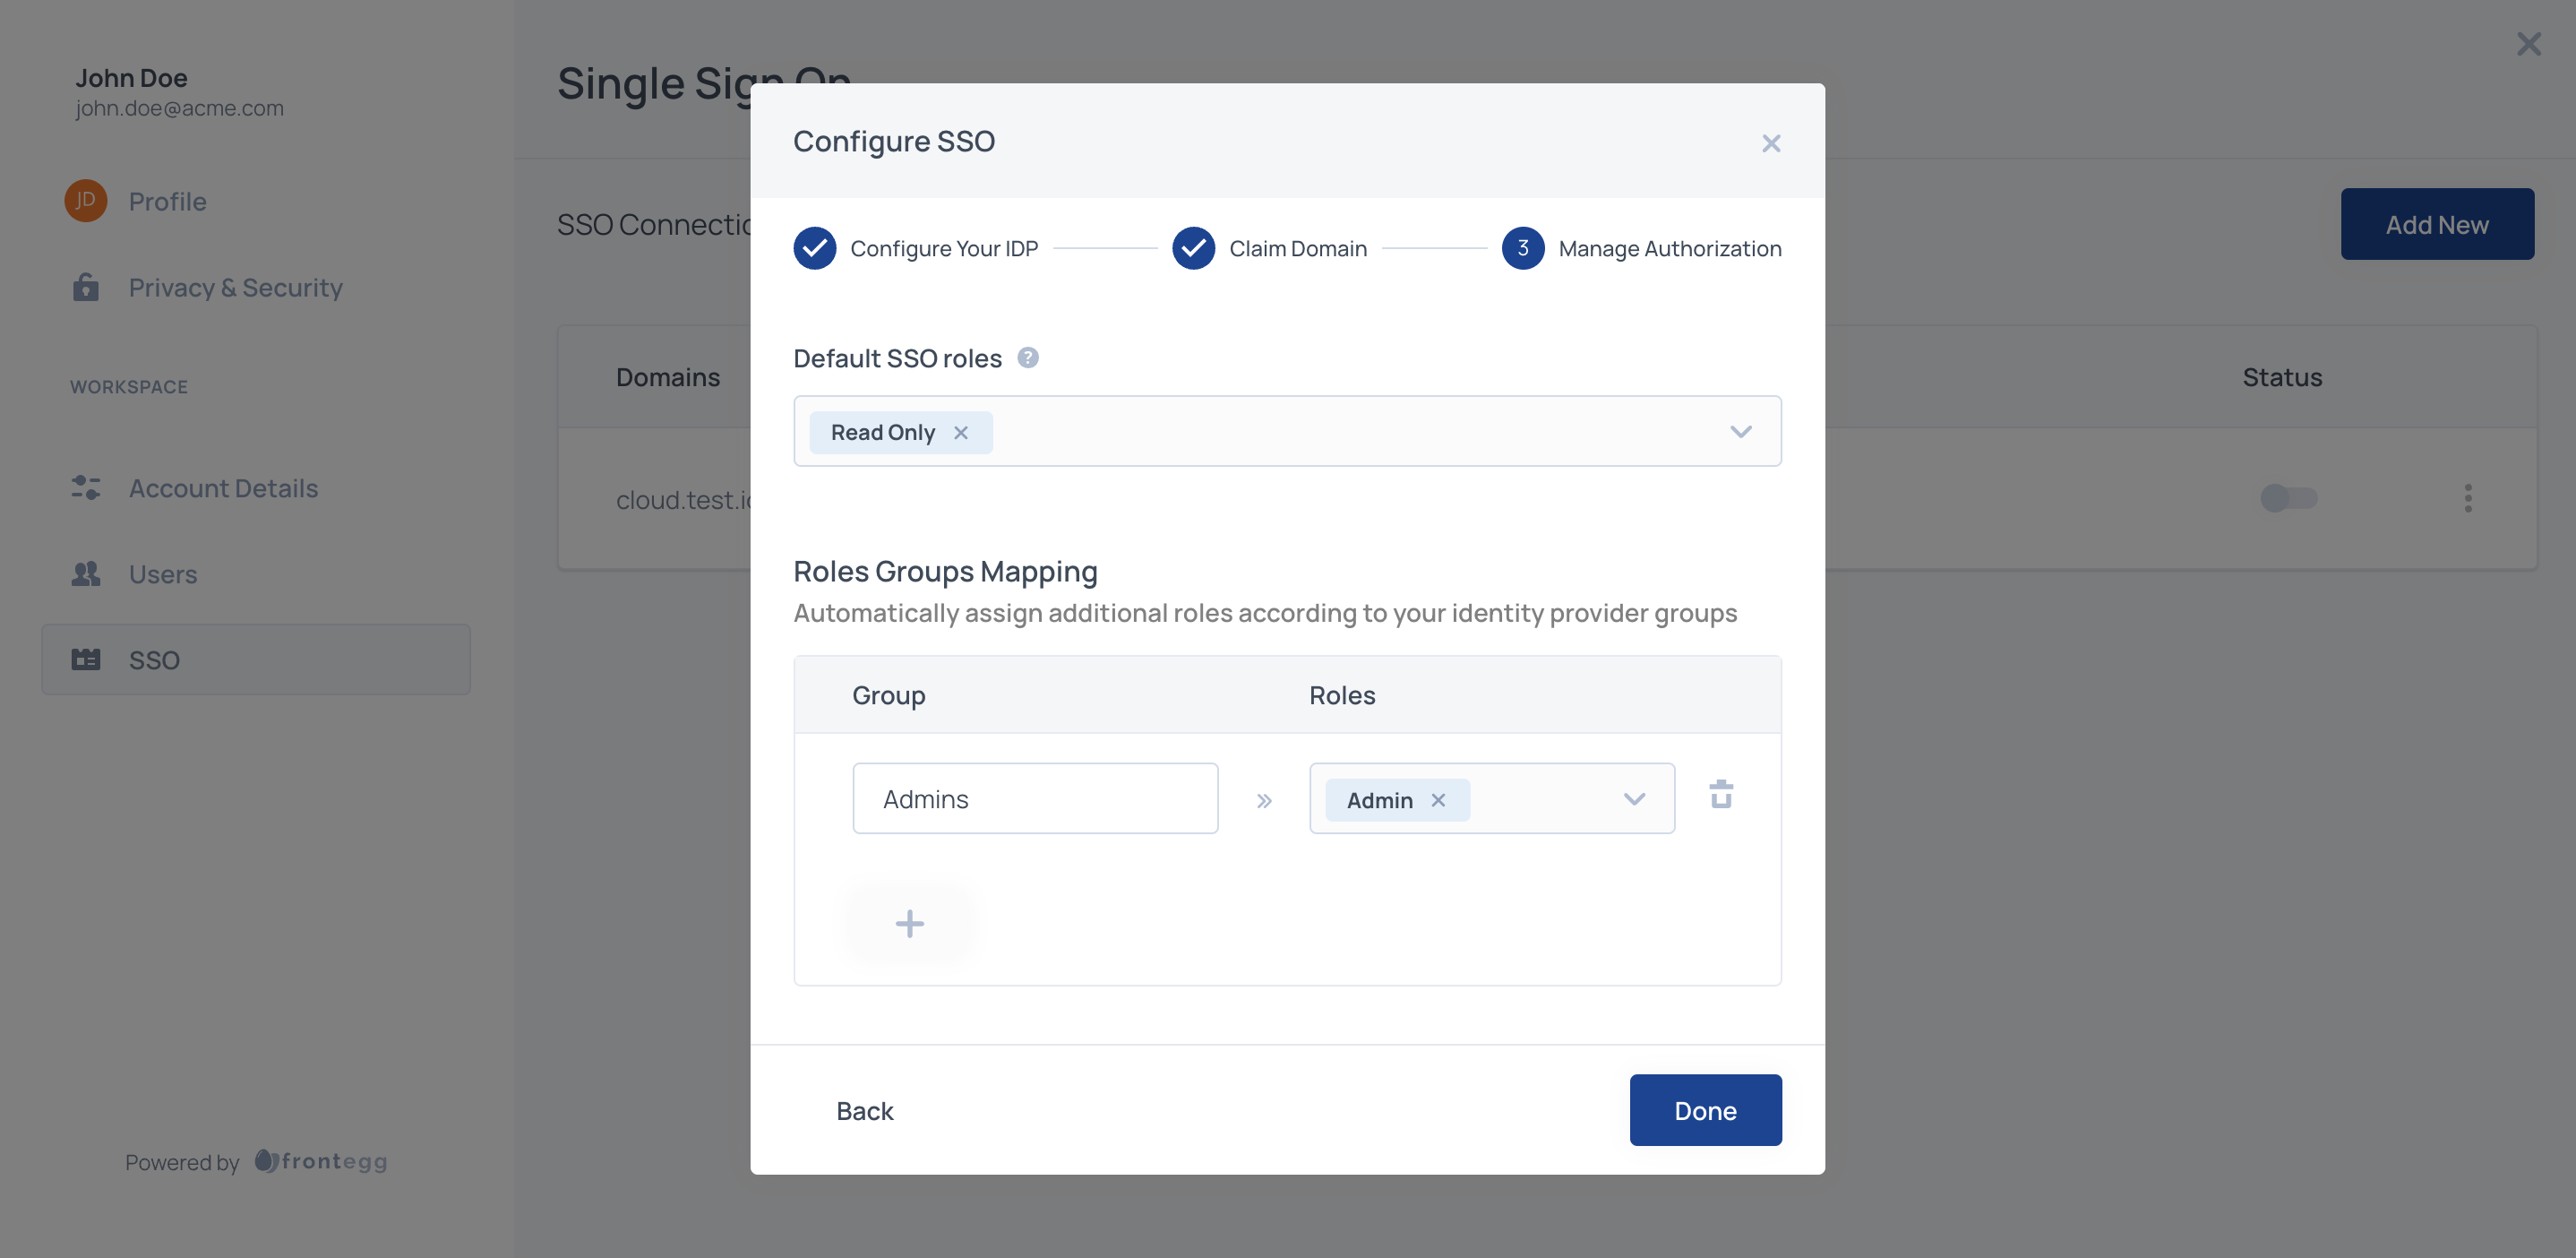
STEP 6: Manage Authorization
Select which roles should be assigned to SSO users by default and map IDP groups to specific roles. Roles you assign to users through SSO will apply regardless of whatever additional roles you assign to those users.
Default SSO Roles
Assign default roles to all SSO users by adding one or more Frontegg roles from your list of predefined roles.

Whichever roles you include in the input, those roles will be assigned to all SSO users.
By default the groups that the user passes from the IDP are being checked only upon user creation - first login via SSO. If you'd like to check for the users groups' on each login, please contact Frontegg.
STEP 7: Mapping Groups to Roles (Optional)
When configuring SSO for an account, you have the option to map your IDP groups to roles available in the application.
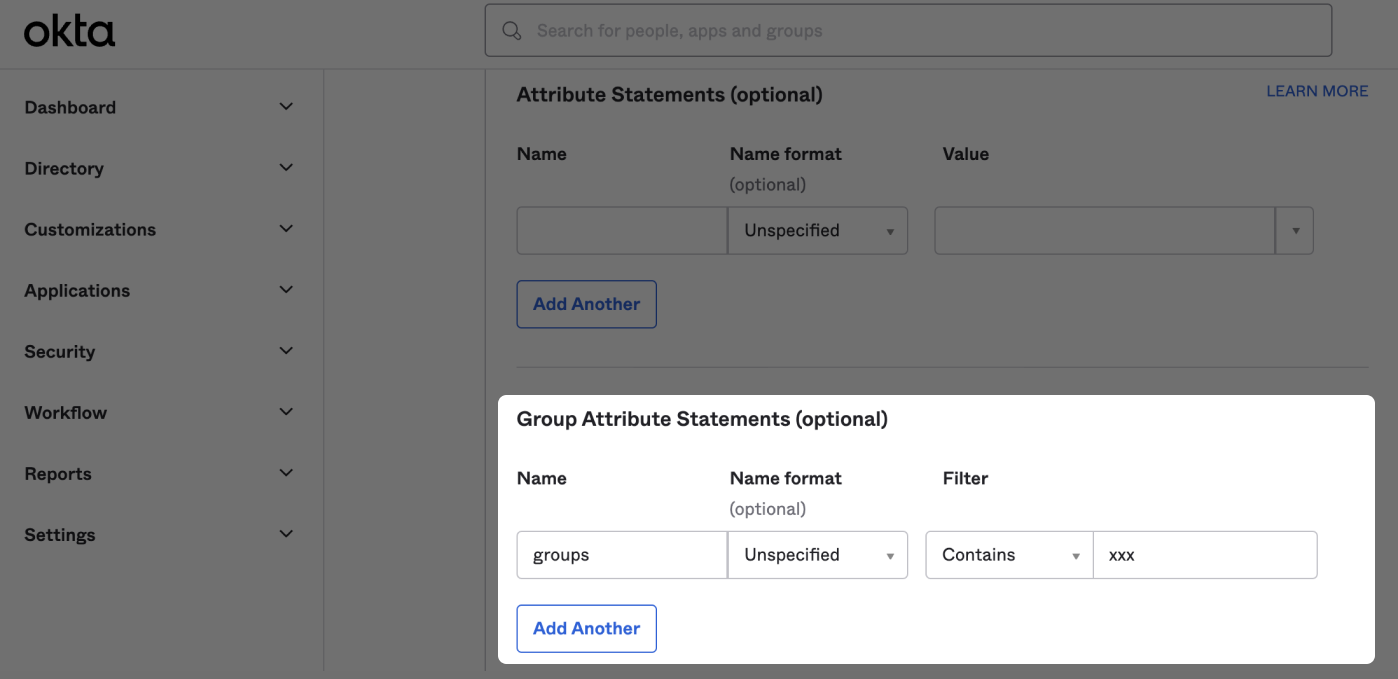
For the mapping to work, first, you should configure your IDP so that the name of the group attribute that is sent in the SAML response is groups.
You'll also need the IDP group names from your IDP that you want to map to your roles. Below is an example of how to find IDP group names in Okta.
Sign in to your Okta account and go to Directory and find the Groups page. In the image below of an example Okta account, Managers is an Okta Group Name.
Use those Group Names to map groups to roles.
In the configuration section of the Admin portal map the groups that your users will be passing to corresponding roles in your application.
Step 8: Save the SSO connection
Save the connection and make sure that it is enabled
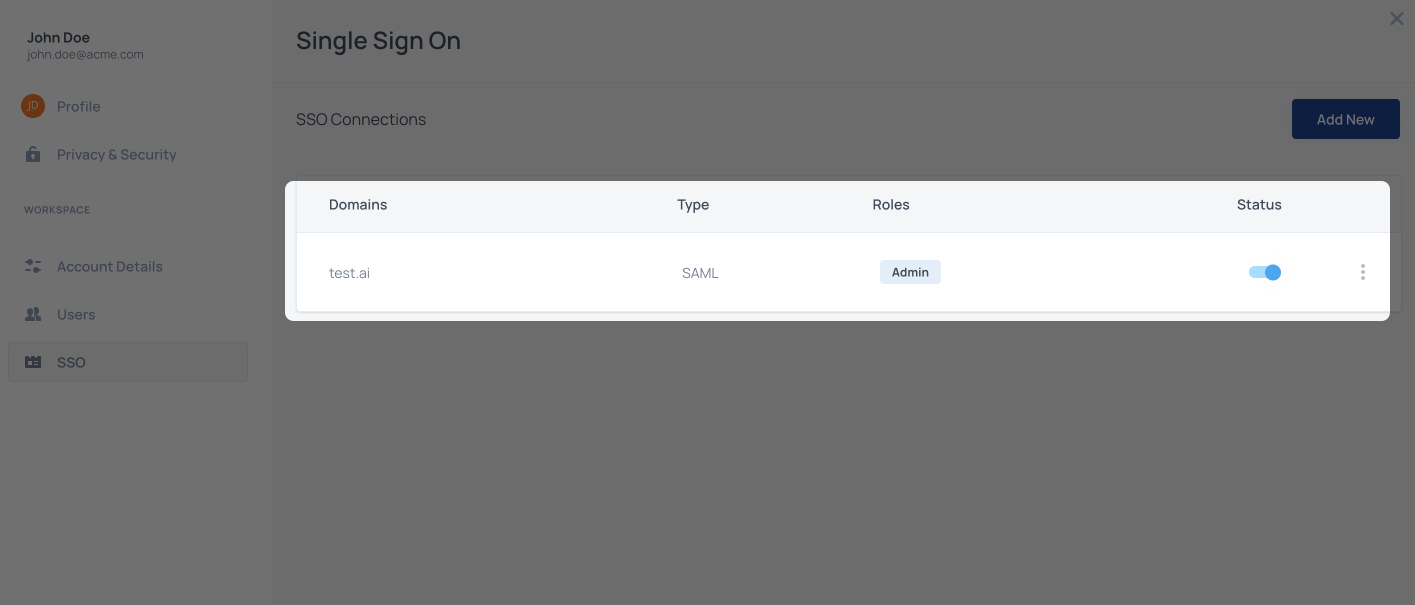
That's it! Now all users with the domain that was configured for the connection, will be redirected to their IDP when they will try to sign in.
Additional resources
FAQs related to SAML SSO
What do tenant SSO failed logs mean?
Why do I get an error when uploading an XML file from Jumpcloud?
Updated 12 months ago